|
|
|
Porsche, and the Porsche crest are registered trademarks of Dr. Ing. h.c. F. Porsche AG.
This site is not affiliated with Porsche in any way. Its only purpose is to provide an online forum for car enthusiasts. All other trademarks are property of their respective owners. |
|
|

  |

| J P Stein |
 Apr 3 2011, 11:00 AM Apr 3 2011, 11:00 AM
Post
#161
|
|
Irrelevant old fart  Group: Members Posts: 8,797 Joined: 30-December 02 From: Vancouver, WA Member No.: 45 Region Association: None |
(IMG:style_emoticons/default/agree.gif)
A couple other things come into play. One is how much rust there is inside the ear. Another is: Is there any overlap of the spot welds to the outside edge of the pinch seam. Most cracks I've seen appear to come from the outside edge. Again I'll say. Seam welding up the pinch seam is good insurance. Attached thumbnail(s) 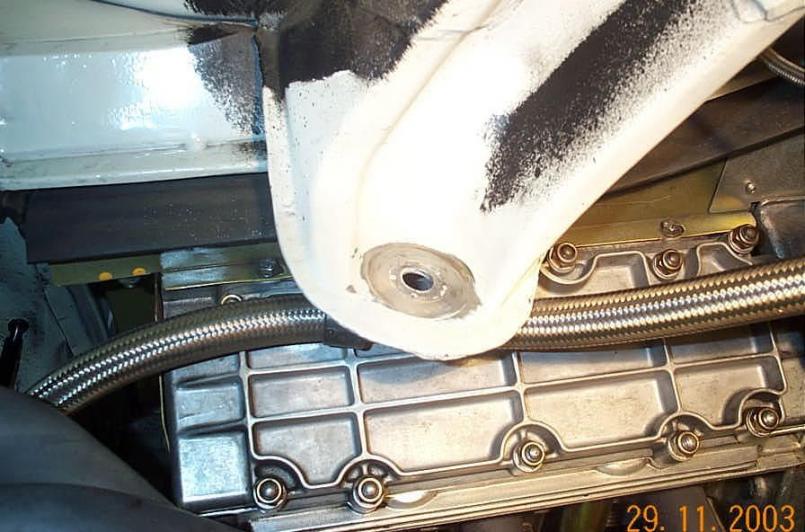
|
   |

 
|
| sawtooth |
Apr 3 2011, 10:58 PM
Post
#162
|
|
Member Group: Members Posts: 297 Joined: 25-June 08 From: Boise, ID Member No.: 9,211 Region Association: Intermountain Region |
QUOTE(J P Stein @ Apr 3 2011, 11:00 AM)  (IMG:style_emoticons/default/agree.gif) A couple other things come into play. One is how much rust there is inside the ear. Another is: Is there any overlap of the spot welds to the outside edge of the pinch seam. Most cracks I've seen appear to come from the outside edge. Again I'll say. Seam welding up the pinch seam is good insurance. Thanks JP, that makes sense. I welded up the seams around the ears today. |
|
|
|
| sawtooth |
Apr 7 2011, 11:55 PM
Post
#163
|
|
Member Group: Members Posts: 297 Joined: 25-June 08 From: Boise, ID Member No.: 9,211 Region Association: Intermountain Region |
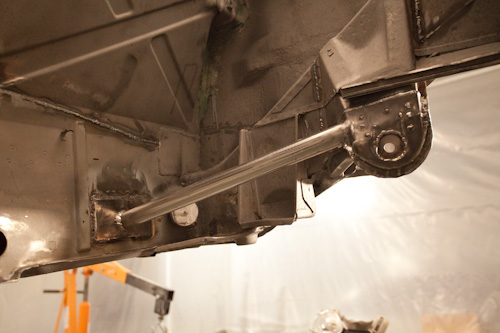
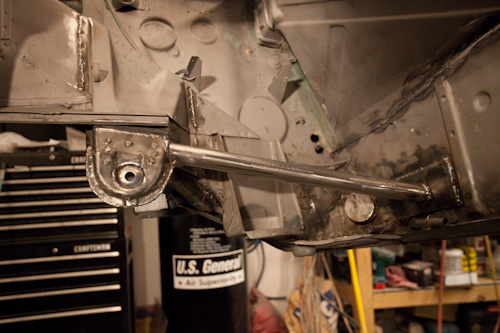
Received my tangerine ear reinforcements today. Thanks Chris for the fast shipping! And I made my own ear to firewall brace.
  This shows the welded the seam around the ear, and the drain hole left open. 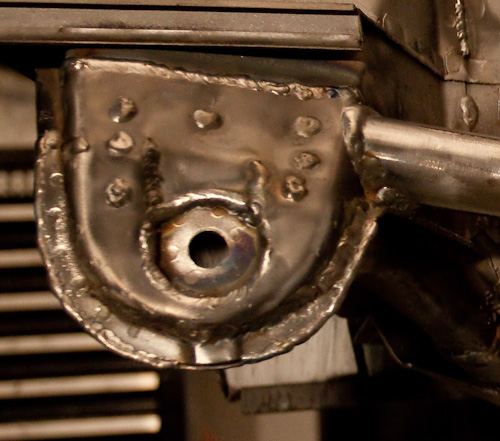 |
|
|
|
| pktzygt |
Apr 8 2011, 03:44 AM
Post
#164
|
|
Member Group: Members Posts: 328 Joined: 20-March 07 From: Chesapeake, VA Member No.: 7,611 Region Association: MidAtlantic Region |
That tube isn't round, is it? What did you use? I'm about to do something similar next week. I was thinking about .120 wall 1" square tubing just because I have an easier time cutting the correct angles in square tubing and I have some handy.
|
|
|
|
| sawtooth |
Apr 8 2011, 09:02 AM
Post
#165
|
|
Member Group: Members Posts: 297 Joined: 25-June 08 From: Boise, ID Member No.: 9,211 Region Association: Intermountain Region |
QUOTE(pktzygt @ Apr 8 2011, 03:44 AM) That tube isn't round, is it? What did you use? I'm about to do something similar next week. I was thinking about .120 wall 1" square tubing just because I have an easier time cutting the correct angles in square tubing and I have some handy. It is round, I believe it is .125" wall and 1" id. I think it's easier working with round tubing then square in this situation. With either you still have to get the angles right on the ends, but with the round you can rotate slightly to adjust for best fit. With square tubing you really can't rotate unless you don't care about the tube being at right angles with the rest of the car. |
|
|
|
| charliew |
Apr 8 2011, 09:59 AM
Post
#166
|
|
Advanced Member Group: Members Posts: 2,363 Joined: 31-July 07 From: Crawford, TX. Member No.: 7,958 |
I will probably make the ear reinforcements for my 75 out of some 16 ga I have on hand. What gauge is Chris's made from. 16 ga is a little thick to form easily.
|
|
|
|
| sawtooth |
Apr 8 2011, 10:03 AM
Post
#167
|
|
Member Group: Members Posts: 297 Joined: 25-June 08 From: Boise, ID Member No.: 9,211 Region Association: Intermountain Region |
QUOTE(charliew @ Apr 8 2011, 09:59 AM) I will probably make the ear reinforcements for my 75 out of some 16 ga I have on hand. What gauge is Chris's made from. 16 ga is a little thick to form easily. Chris's are 16 ga. I bought the flat version, and shaped them during the install. I thought about making them myself, but decided his laser cut pattern would save me a bunch of time. Glad I did, it was a 5 min. install per side. |
|
|
|
| sawtooth |
Apr 8 2011, 10:51 AM
Post
#168
|
|
Member Group: Members Posts: 297 Joined: 25-June 08 From: Boise, ID Member No.: 9,211 Region Association: Intermountain Region |
QUOTE(BRAVE_HELIOS @ Mar 31 2011, 06:26 PM) Holy crap Dean, you are one determined SOB! (IMG:style_emoticons/default/laugh.gif) It's hard to believe it was just a few weeks ago, you we soo happy just to get in on the road and we were all happy to get a ride! (IMG:style_emoticons/default/driving.gif) Now look at it... simply astounding! (IMG:style_emoticons/default/clap23.gif) So let's see... work, sleep, family and Porsche... Hmm, It just don't add up! You must operate on the 36 hour clock! (IMG:style_emoticons/default/gint2.gif) Great job man! (IMG:style_emoticons/default/dance.gif) Thanks Tony, I just try to get a small project done each evening, big projects get divided up. Some times it doesn't work out because of other stuff going on with life, but more often than not I get something accomplished each night. I end up with 1 solid day most weekends. It all adds up. If I didn't have an event I was shooting for, forget it. I'd get side tracked and never get finished. Even if I don't make it to this year's WCR, the motivation has been great, and I'll make it to the next event. Can't wait to see your car on the road! |
|
|
|
| JRust |
Apr 8 2011, 12:18 PM
Post
#169
|
|
914 Guru Group: Members Posts: 6,316 Joined: 10-January 03 From: Albany Oregon Member No.: 129 Region Association: Pacific Northwest |
Very nice Dean. I will be doing this on my v8 car soon. Paint that sucker man. I want to see it at WCR
|
|
|
|
| sawtooth |
Apr 8 2011, 01:40 PM
Post
#170
|
|
Member Group: Members Posts: 297 Joined: 25-June 08 From: Boise, ID Member No.: 9,211 Region Association: Intermountain Region |
QUOTE(JRust @ Apr 8 2011, 12:18 PM) Very nice Dean. I will be doing this on my v8 car soon. Paint that sucker man. I want to see it at WCR Yeah, somebody keeps reminding of things I need to do before paint (IMG:style_emoticons/default/poke.gif) I believe it was you and your broken suspension ear that got me fired up about reinforcement. And you just reminded me today that I need to weld in a brace for my master cylinder (IMG:style_emoticons/default/idea.gif) What else am I forgetting? I'd rather get 'em done now while it's all easy access. I hear ya though, it's time to get 'er done. Hope to get the body work done this weekend. By next weekend I hope to be priming and undercoating. |
|
|
|
| JRust |
Apr 8 2011, 02:04 PM
Post
#171
|
|
914 Guru Group: Members Posts: 6,316 Joined: 10-January 03 From: Albany Oregon Member No.: 129 Region Association: Pacific Northwest |
Yeah your making good progress. Despite me riminding you of extra stuff to do (IMG:style_emoticons/default/sad.gif) . Your getting most of the hard stuff done though at the right time. Although reassembly can be very slow after paint. I'd offer to come out with that but I don't want to jinx you. My reassembly of my creamsicle was slow & it didn't work when I finished (IMG:style_emoticons/default/headbang.gif)
|
|
|
|
| Quebecer |
Apr 11 2011, 03:53 AM
Post
#172
|
|
SuperDan Group: Members Posts: 100 Joined: 13-May 04 From: Lachenaie, Qc, CANADA Member No.: 2,063 |
QUOTE(sawtooth @ Mar 30 2011, 11:17 AM) QUOTE(Quebecer @ Mar 30 2011, 03:39 AM) I've been contemplating doing exactly the same thing (blasting booth in garage) for the longest time. I live in the suburbs, neither my neighbours, nor my wife would let me do it outside. Did you leave the plastic loose on the bottom, did you cover the ceiling and the floor? Can you tell us (or show us) more about your booth? Keep up the good work! I used a good quality duct tape to seal the barrier wall to the floor. I didn't cover the ceiling or the floor. The biggest obvious problem with this whole setup is the silica dust. It's toxic to breath so you need a good mask. And if your garage is attached to your house like mine is, you'd want to be really careful to keep the dust isolated to the booth. Honestly if I do another car again I'll be looking for an outdoor location to do it. I could go on about what I learned as far as equipment goes etc. happy to share. Just let me know if you want any more info. - Dean Actually, yes I would love to learn more about the equipment (blasting gun, compressor, etc) used and the setup of your booth. I was thinking of installing a positive pressure ventilation system using supply air from outside with large fans at top rear of the booth and the air exit at bottom front with filters and smaller fans. Did you use a dust collector of some kind? My garage is attached to the house, similar to yours, but my floor has been epoxied therefore I'll want to protect it. I wanted to get it done outside, but they want like $1000, that's why I wanted to do it myself. Also, then I can keep quality control in my own hands, literally. Thanks for your help, your thread is very interesting. |
|
|
|
| sawtooth |
Apr 11 2011, 11:32 PM
Post
#173
|
|
Member Group: Members Posts: 297 Joined: 25-June 08 From: Boise, ID Member No.: 9,211 Region Association: Intermountain Region |
QUOTE(Quebecer @ Apr 11 2011, 03:53 AM) QUOTE(sawtooth @ Mar 30 2011, 11:17 AM) QUOTE(Quebecer @ Mar 30 2011, 03:39 AM) I've been contemplating doing exactly the same thing (blasting booth in garage) for the longest time. I live in the suburbs, neither my neighbours, nor my wife would let me do it outside. Did you leave the plastic loose on the bottom, did you cover the ceiling and the floor? Can you tell us (or show us) more about your booth? Keep up the good work! I used a good quality duct tape to seal the barrier wall to the floor. I didn't cover the ceiling or the floor. The biggest obvious problem with this whole setup is the silica dust. It's toxic to breath so you need a good mask. And if your garage is attached to your house like mine is, you'd want to be really careful to keep the dust isolated to the booth. Honestly if I do another car again I'll be looking for an outdoor location to do it. I could go on about what I learned as far as equipment goes etc. happy to share. Just let me know if you want any more info. - Dean Actually, yes I would love to learn more about the equipment (blasting gun, compressor, etc) used and the setup of your booth. I was thinking of installing a positive pressure ventilation system using supply air from outside with large fans at top rear of the booth and the air exit at bottom front with filters and smaller fans. Did you use a dust collector of some kind? My garage is attached to the house, similar to yours, but my floor has been epoxied therefore I'll want to protect it. I wanted to get it done outside, but they want like $1000, that's why I wanted to do it myself. Also, then I can keep quality control in my own hands, literally. Thanks for your help, your thread is very interesting. For the media blaster I used a hf pressurized unit that holds 100lbs of media. It worked well but was pushing the limits for a complete car. For the compressor I have a 2-stage 170psi 60gal US General. I used a 3/8" line but it really needs a 1/2" line to keep up the volume at the gun. With this setup I had to stop every once in a while to let the pressure build, which got old fast. I ended up borrowing a diesel compressor on a trailer used for blowing out sprinkler lines. With this I was able to easily keep the gun pressure at 90-100psi constant. It made a huge difference in how fast the job went. I tried using a blast hood but I quickly tossed it for a better solution. I ended up liking a pair of clear goggles with a screen face shield the best. I also wore a 3m organic vapor breathing filter. To keep the sand off I wore an old rain coat with the hood up. It worked great, I could see and was much more mobile than fighting with the blasting hood in tough to reach places. I also found with a 500 watt work light I could see through the dust pretty well in the dark places up under the wheel wells. I used 16 bags (100lbs each) of #30 sand which cost me about $5/bag. I went through several ceramic tips for the blaster nozzle, and used 12 gal of diesel in the compressor. It took me about 10 hrs spread over the course of 3 days. I didn't have a dust collector or fans. I just had an opening to the outside at each end of the booth that I opened up to let the air flow through. All I can say is that I'm glad it's over, and I love the results. But I would find a way to get it done outdoors if I ever do another one. - Dean |
|
|
|
| Zaney |
Apr 18 2011, 09:31 PM
Post
#174
|
|
Deuchland en der Haus Group: Members Posts: 461 Joined: 1-March 04 From: Engine 11 Redmond, WA Member No.: 1,738 Region Association: Pacific Northwest |
QUOTE(sawtooth @ Mar 29 2011, 11:27 PM) New gauges arrived today, can't wait until it's time to install these. My goal was to get updated gauges with as close to original look as possible. I'm really happy with the way they turned out. Electric programmable speedo which is driven by the stock suby vss. Dean, Will these gauges be a plug and play option or do you have to use a custom dash plate? Awesome gauges! If they are easy enough to swap out that is what I will probably do (IMG:style_emoticons/default/drooley.gif) Cheers, Nate |
|
|
|
| sawtooth |
Apr 19 2011, 12:33 PM
Post
#175
|
|
Member Group: Members Posts: 297 Joined: 25-June 08 From: Boise, ID Member No.: 9,211 Region Association: Intermountain Region |
QUOTE(Zaney @ Apr 18 2011, 09:31 PM) QUOTE(sawtooth @ Mar 29 2011, 11:27 PM) New gauges arrived today, can't wait until it's time to install these. My goal was to get updated gauges with as close to original look as possible. I'm really happy with the way they turned out. Electric programmable speedo which is driven by the stock suby vss. Dean, Will these gauges be a plug and play option or do you have to use a custom dash plate? Awesome gauges! If they are easy enough to swap out that is what I will probably do (IMG:style_emoticons/default/drooley.gif) Cheers, Nate Hey Nate, I'll be making a custom face plate. The tach is only 4", too small for the original tach hole. They are really nice, only about 1" thick too. |
|
|
|
| sawtooth |
Apr 19 2011, 10:38 PM
Post
#176
|
|
Member Group: Members Posts: 297 Joined: 25-June 08 From: Boise, ID Member No.: 9,211 Region Association: Intermountain Region |
Been working on body work and getting undercarriage ready to prime. A few update shots. Seam seal and wurth stone guard is next.
before: 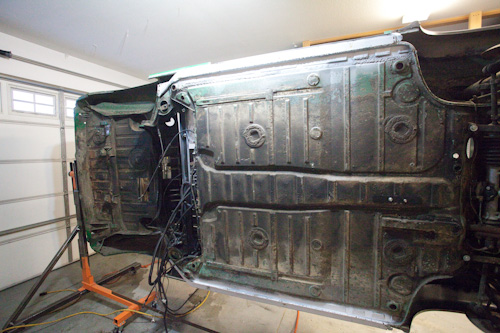 after: 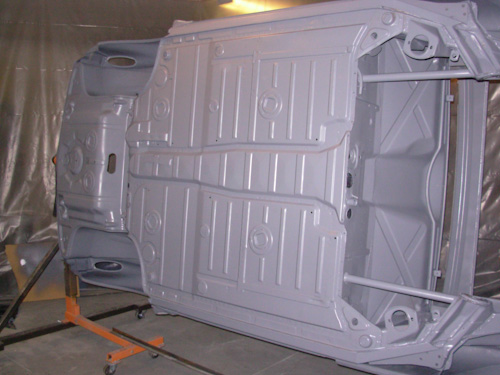 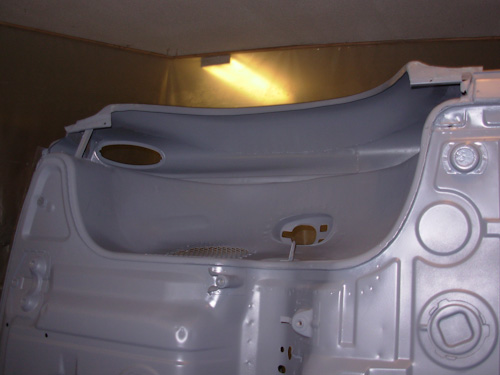 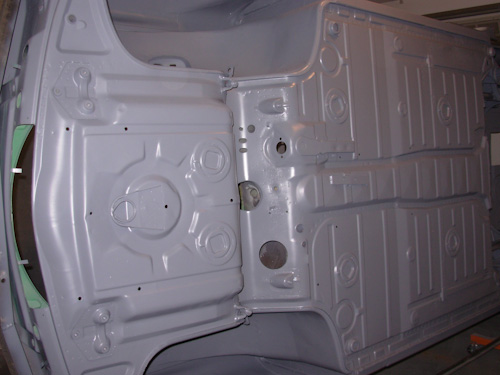 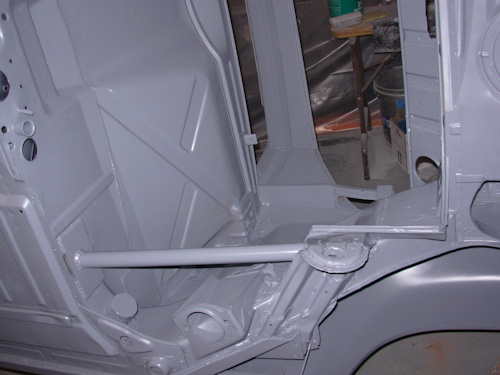 |
|
|
|
| draganc |
Apr 19 2011, 10:48 PM
Post
#177
|
|
Senior Member Group: Members Posts: 725 Joined: 2-November 09 From: central new jersey Member No.: 11,000 Region Association: North East States |
holy scheisse! that looks sweet!!
|
|
|
|
| sawtooth |
Apr 19 2011, 10:55 PM
Post
#178
|
|
Member Group: Members Posts: 297 Joined: 25-June 08 From: Boise, ID Member No.: 9,211 Region Association: Intermountain Region |
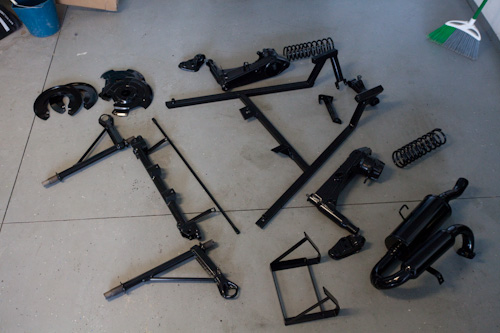
Got a truck load of parts back from the powder coater.
 |
|
|
|
| sawtooth |
Apr 19 2011, 10:57 PM
Post
#179
|
|
Member Group: Members Posts: 297 Joined: 25-June 08 From: Boise, ID Member No.: 9,211 Region Association: Intermountain Region |
QUOTE(draganc @ Apr 19 2011, 10:48 PM) holy scheisse! that looks sweet!! Thanks, it's nice to finally get everything one color, even if it's primer gray. |
|
|
|
| JRust |
Apr 19 2011, 11:07 PM
Post
#180
|
|
914 Guru Group: Members Posts: 6,316 Joined: 10-January 03 From: Albany Oregon Member No.: 129 Region Association: Pacific Northwest |
QUOTE(sawtooth @ Apr 19 2011, 09:55 PM) Got a truck load of parts back from the powder coater. (IMG:style_emoticons/default/drooley.gif) ! Excellent but more of your car man (IMG:style_emoticons/default/chowtime.gif) |
|
|
|
|
1 User(s) are reading this topic (1 Guests and 0 Anonymous Users)
0 Members:

|
Lo-Fi Version | Time is now: 19th April 2025 - 11:21 PM |
Invision Power Board
v9.1.4 © 2025 IPS, Inc.