|
|

|
Porsche, and the Porsche crest are registered trademarks of Dr. Ing. h.c. F. Porsche AG.
This site is not affiliated with Porsche in any way. Its only purpose is to provide an online forum for car enthusiasts. All other trademarks are property of their respective owners. |
|
|
  |
| zig-n-zag |
 Jan 31 2009, 07:48 PM Jan 31 2009, 07:48 PM
Post
#61
|
|
Member   Group: Members Posts: 191 Joined: 18-May 06 From: Hawaii Member No.: 6,024 |
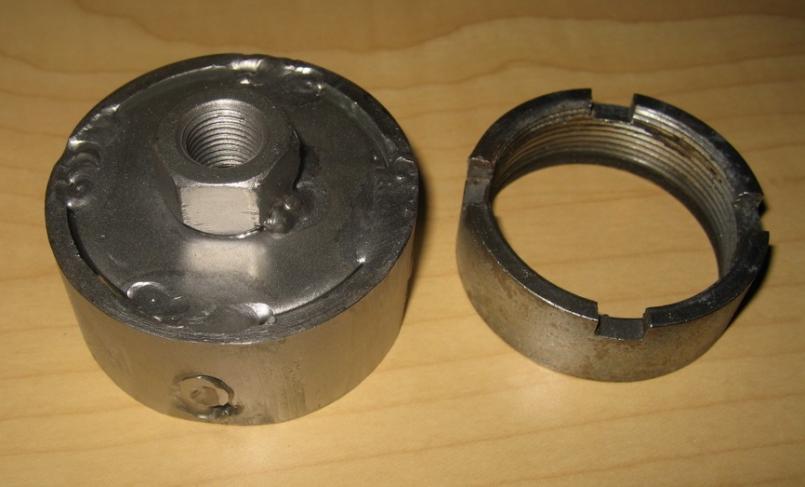
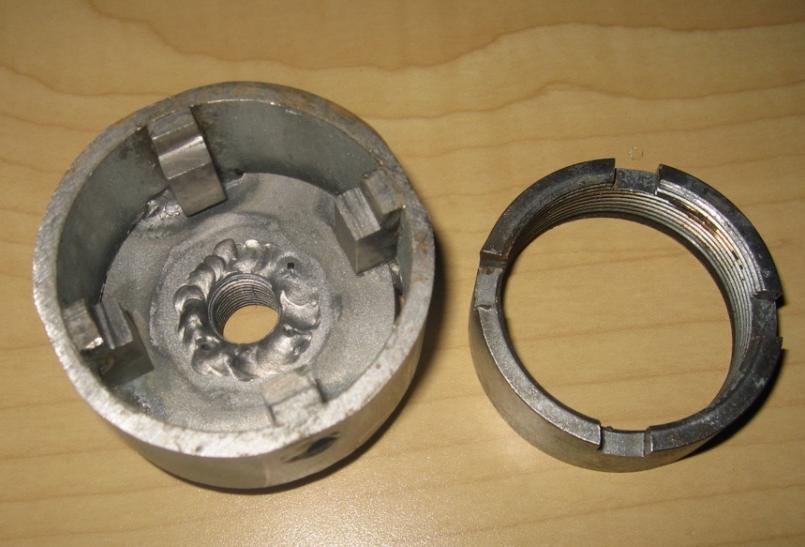
tranny nut buster.... (IMG:http://i631.photobucket.com/albums/uu34/zig-n-zag/IMG_0042.jpg)
(IMG:http://i631.photobucket.com/albums/uu34/zig-n-zag/IMG_0043.jpg) |
| majkos |
 Feb 1 2009, 09:59 AM Feb 1 2009, 09:59 AM
Post
#62
|
|
Senior Member    Group: Members Posts: 1,370 Joined: 29-February 04 From: Mile High 914 Member No.: 1,729 Region Association: Rocky Mountains |
I'm suprise no one made a Engine Head Sensor tool. Let's step over to the tool box (IMG:style_emoticons/default/rolleyes.gif) 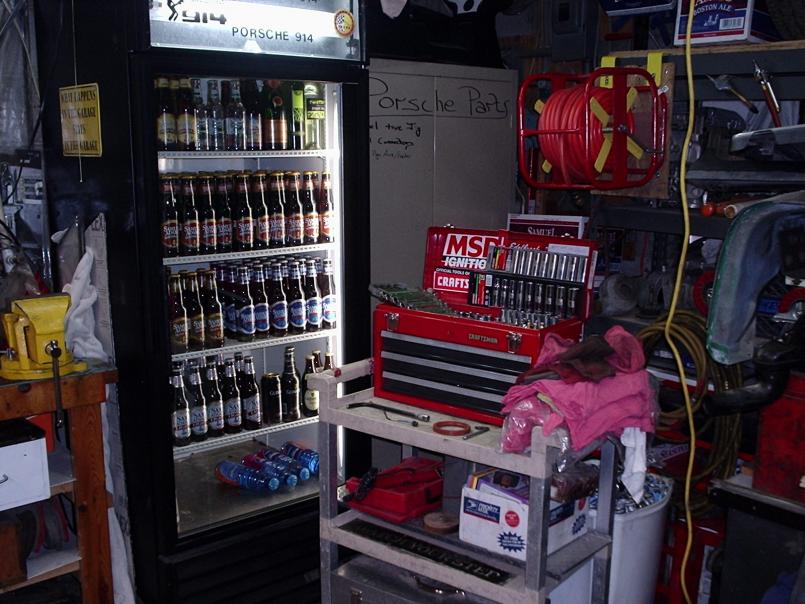 |
| majkos |
 Feb 1 2009, 10:20 AM Feb 1 2009, 10:20 AM
Post
#63
|
|
Senior Member    Group: Members Posts: 1,370 Joined: 29-February 04 From: Mile High 914 Member No.: 1,729 Region Association: Rocky Mountains |
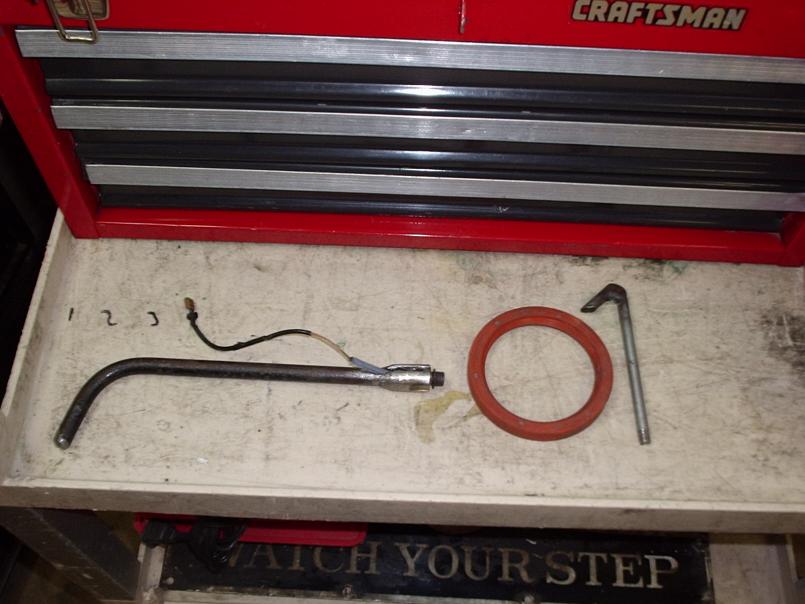 Simple 13mm socket, 914 jack handle, cut at a certain length, (to fit in engine compartment.) Welding, grinding, cut off tool makes slot for wire. No need to remove intakes. (IMG:style_emoticons/default/aktion035.gif) The other tool is a "Short" Engine seal removal. Can't remember why I was in tight quarters, but 5 minutes,Fabing and welding, seal removed and moved on. Think I was getting ready for some AX'ing, the next day (IMG:style_emoticons/default/blink.gif) |
| Sleepin |
 Feb 1 2009, 11:15 AM Feb 1 2009, 11:15 AM
Post
#64
|
|
Advanced Member     Group: Members Posts: 3,647 Joined: 20-November 07 From: Grand Junction, Co. Member No.: 8,357 Region Association: Rocky Mountains |
......and I am missing your Superbowl party.... (IMG:style_emoticons/default/WTF.gif)
Judging by your cooler, I may need to stop by one of these days Kevin! (IMG:style_emoticons/default/biggrin.gif) |
| Gint |
 Feb 1 2009, 11:22 AM Feb 1 2009, 11:22 AM
Post
#65
|
|
Mike Ginter                Group: Admin Posts: 16,095 Joined: 26-December 02 From: Denver CO. Member No.: 20 Region Association: Rocky Mountains  |
You've never been to Kevin's?!?! You need to move.
|
| Todd Enlund |
 Feb 1 2009, 11:35 AM Feb 1 2009, 11:35 AM
Post
#66
|
|
Resident Photoshop Guru     Group: Members Posts: 3,251 Joined: 24-August 07 From: Laurelhurst (Portland), Oregon Member No.: 8,032 Region Association: Pacific Northwest |
Here's my home made blasting cabinet. I just finished it tonight. (IMG:style_emoticons/default/biggrin.gif) That's pretty sweet! |
| majkos |
 Feb 1 2009, 02:16 PM Feb 1 2009, 02:16 PM
Post
#67
|
|
Senior Member    Group: Members Posts: 1,370 Joined: 29-February 04 From: Mile High 914 Member No.: 1,729 Region Association: Rocky Mountains |
You've never been to Kevin's?!?! You need to move. (IMG:style_emoticons/default/biggrin.gif) (IMG:style_emoticons/default/beerchug.gif) (IMG:style_emoticons/default/beer3.gif) (IMG:style_emoticons/default/beer.gif) (IMG:style_emoticons/default/drunk.gif) (IMG:style_emoticons/default/aktion035.gif) |
| Wilhelm |
 Feb 2 2009, 10:11 PM Feb 2 2009, 10:11 PM
Post
#68
|
|
Member   Group: Members Posts: 408 Joined: 7-September 07 From: Hooterville, OR Member No.: 8,088 Region Association: None |
|
| McMark |
 Feb 3 2009, 12:49 AM Feb 3 2009, 12:49 AM
Post
#69
|
|
914 Freak!                Group: Retired Admin Posts: 20,179 Joined: 13-March 03 From: Grand Rapids, MI Member No.: 419 Region Association: None |
Nice work.
|
| ChrisFoley |
 Feb 5 2009, 09:23 AM Feb 5 2009, 09:23 AM
Post
#70
|
|
I am Tangerine Racing      Group: Members Posts: 7,968 Joined: 29-January 03 From: Bolton, CT Member No.: 209 Region Association: None 
|
Delrin rear bushing cutting tools
Top: Sleeve that fits an already reamed bushing Center: Reamer with long shaft and sleeve that fits the unreamed bushing in the opposite end of the trailing arm. At the left end a socket is welded to the shaft to turn the reamer. The rosette welds hold short pins that capture the square end of the reamer but allow it to be removed as needed. Bottom: Face cutting tool to precisely adjust the end play of a pivot shaft in the bushings Attached image(s) 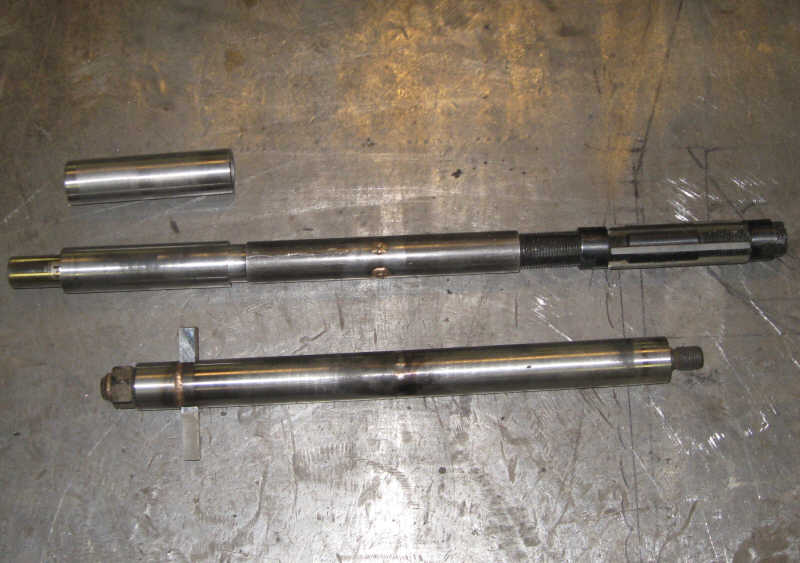
|
| larss |
 Sep 22 2009, 01:15 AM Sep 22 2009, 01:15 AM
Post
#71
|
|
Member   Group: Members Posts: 431 Joined: 10-September 09 From: Sweden Member No.: 10,787 Region Association: Scandinavia |
Rear boot torsion bar tool
Made this tool for fitting of (fighting with!) the torsion bars to the rear boot hinges, there is a picture of it in the Haynes manual, need a R and L version, this is the R one...still with this tool I did not like fighting with the bar (talk about mouse trap!), is there another way of fitting the bars? /Lars S 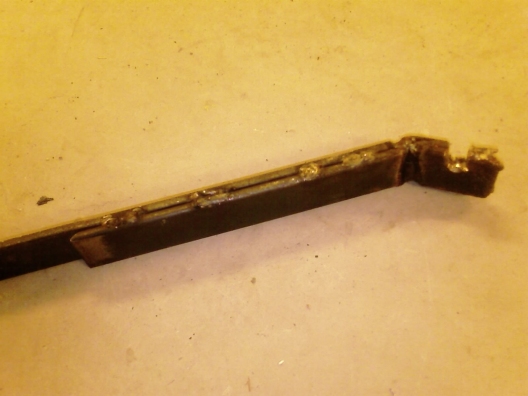 |
| charliew |
 Sep 22 2009, 08:24 AM Sep 22 2009, 08:24 AM
Post
#72
|
|
Advanced Member     Group: Members Posts: 2,363 Joined: 31-July 07 From: Crawford, TX. Member No.: 7,958 |
I don't remember where I saw it but the fiero has similiar springs and there is what seems like a pretty good tool available maybe you could copy it if you can find a picture. I need to adjust one of my fieros now. One has been sitting in my shop with the trunk open for about 7 years so maybe it will be okay when I get around to using it again. It also has a lighter trunk than the gt I'm having problems with. I use a cresent wrench with a notch cut in it for my purposes.
|
| jimkelly |
 Apr 28 2010, 07:21 AM Apr 28 2010, 07:21 AM
Post
#73
|
|
Delaware USA     Group: Members Posts: 4,969 Joined: 5-August 04 From: Delaware, USA Member No.: 2,460 Region Association: MidAtlantic Region |
bearing removal tool - not mine
see thread http://www.914world.com/bbs2/index.php?sho...nteresting+find text from designer... Thanks Jeff. I used an 8" x 3/4 " bolt and appropriate nut. Of course, different threaded pieces could work. The important parts are: 1) Black piece, which is a "3" fitting cleanout adapter" from the plumbing section of the hardware store. The small end has a 3" ID and just shy of 3.5" OD. The large end (which rest on the trailing arm) has an ID of 3.5" and an OD of 4". 2) 2" diameter washer which mates with the bearing. 3) 3.5" large washer which rests on top of the black plumbing piece. I added a couple extra washers on top of the large washer as you can see from the pics. This really wasn't necessary. Only needed if the nut is too small for the hole in the large washer. Also, If I really wanted to get fancy and avoid holding the threads with a Vice grip, I could have added two additional nuts and cinched them tight to one another, then held one with a wrench to avoid gnarling up the threads. Attached image(s) 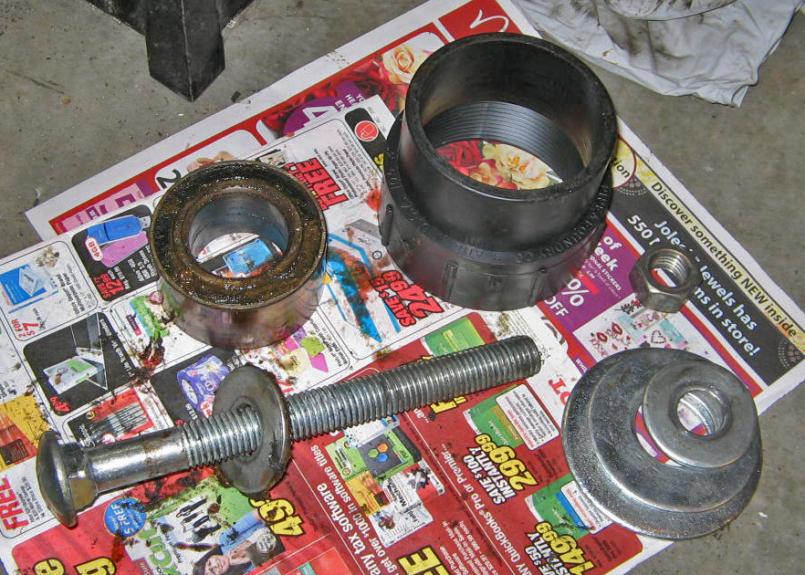
|
| McMark |
 Jul 28 2010, 02:01 PM Jul 28 2010, 02:01 PM
Post
#74
|
|
914 Freak!                Group: Retired Admin Posts: 20,179 Joined: 13-March 03 From: Grand Rapids, MI Member No.: 419 Region Association: None |
Made another tool today. This piece fits tightly on the inside of the rear hub. A slide hammer goes through the middle and a few swings later, the hub is out. Quick, easy and safe. (IMG:style_emoticons/default/boldblue.gif)
Attached image(s) 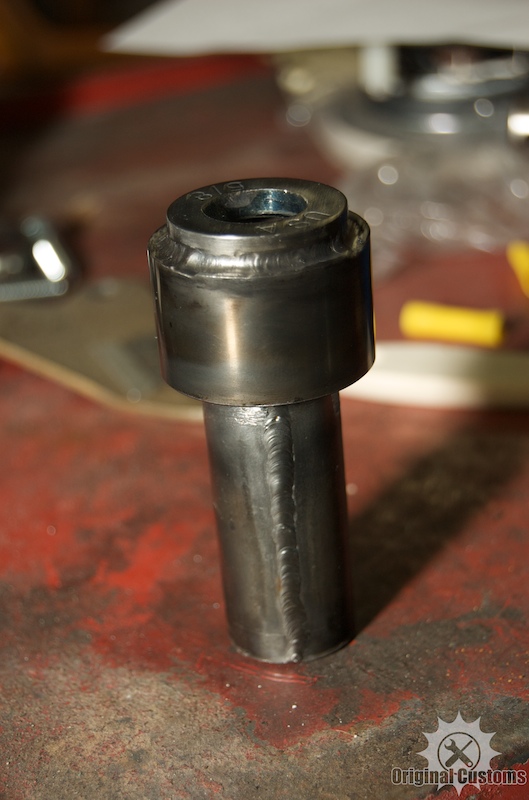 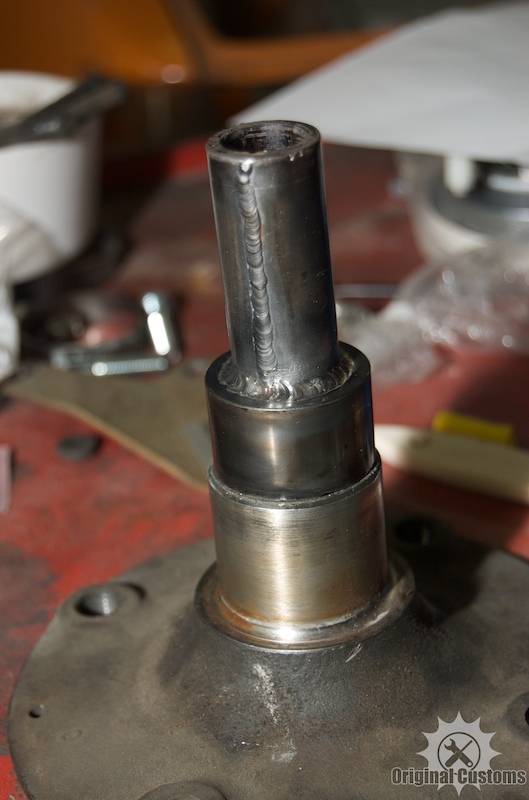
|
| 914werke |
 Jul 30 2010, 09:35 PM Jul 30 2010, 09:35 PM
Post
#75
|
|
"I got blisters on me fingers"           Group: Members Posts: 11,031 Joined: 22-March 03 From: USofA Member No.: 453 Region Association: Pacific Northwest 
|
Here is one that is surprisingly simple but I find I use it the most
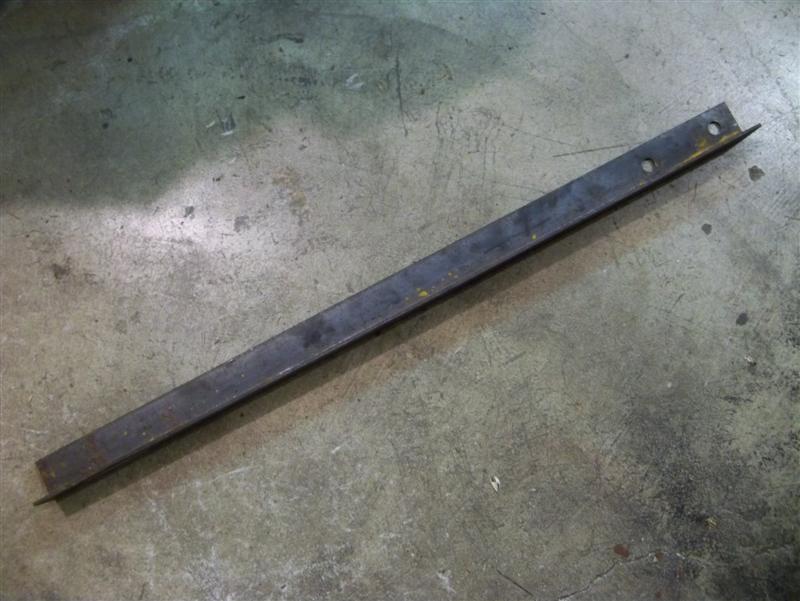 It bolts to the rear hubs w/o wheel using the stock lugs & prevents turning even when busting off then stub nut. (IMG:style_emoticons/default/aktion035.gif) |
| 914werke |
 Jul 30 2010, 09:37 PM Jul 30 2010, 09:37 PM
Post
#76
|
|
"I got blisters on me fingers"           Group: Members Posts: 11,031 Joined: 22-March 03 From: USofA Member No.: 453 Region Association: Pacific Northwest 
|
here is THE tool for unlocking the rear boot (IMG:style_emoticons/default/biggrin.gif)
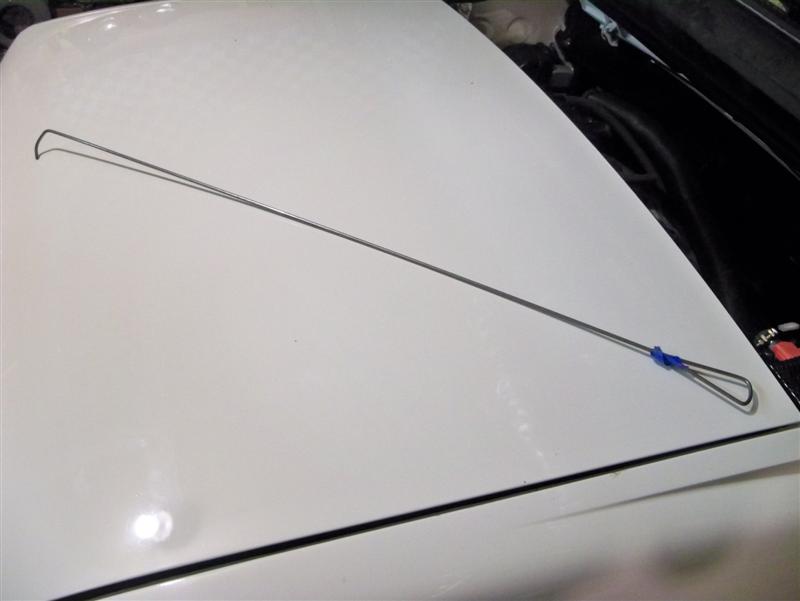 (IMG:style_emoticons/default/bye1.gif) |
| charliew |
 Jul 31 2010, 01:05 PM Jul 31 2010, 01:05 PM
Post
#77
|
|
Advanced Member     Group: Members Posts: 2,363 Joined: 31-July 07 From: Crawford, TX. Member No.: 7,958 |
A picture of you using that tool would be interesting. Do your feet reach the ground?
|
| larss |
 Aug 12 2010, 02:50 AM Aug 12 2010, 02:50 AM
Post
#78
|
|
Member   Group: Members Posts: 431 Joined: 10-September 09 From: Sweden Member No.: 10,787 Region Association: Scandinavia |
Handle made when fitting the rear window, one in each end, found it hard to manouvre the glass into its final position without handles.
Yes I know there are vaccum lifters but I did'nt have any... (IMG:style_emoticons/default/sad.gif) /Lars S (IMG:http://www.914world.com/bbs2/uploads_offsite/www.lsmteknik.se-10787-1281603020.1.jpg) |
| McMark |
 Aug 12 2010, 11:22 AM Aug 12 2010, 11:22 AM
Post
#79
|
|
914 Freak!                Group: Retired Admin Posts: 20,179 Joined: 13-March 03 From: Grand Rapids, MI Member No.: 419 Region Association: None |
(IMG:style_emoticons/default/lol-2.gif) Love it, Lars! That's awesome.
|
| JeffBowlsby |
 Aug 12 2010, 01:07 PM Aug 12 2010, 01:07 PM
Post
#80
|
|
914 Wiring Harnesses      Group: Members Posts: 8,781 Joined: 7-January 03 From: San Ramon CA Member No.: 104 Region Association: None 
|
here is THE tool for unlocking the rear boot (IMG:style_emoticons/default/biggrin.gif)  (IMG:style_emoticons/default/bye1.gif) This looks interesting Rich. How does it fit through the targa latch cup hole when its so long? Can you post a photo of how it works to unlock the latch? |
  |
41 User(s) are reading this topic (41 Guests and 0 Anonymous Users)
0 Members:

|
Lo-Fi Version | Time is now: 27th December 2024 - 07:18 PM |
Invision Power Board
v9.1.4 © 2024 IPS, Inc.


