|
|
|
Porsche, and the Porsche crest are registered trademarks of Dr. Ing. h.c. F. Porsche AG.
This site is not affiliated with Porsche in any way. Its only purpose is to provide an online forum for car enthusiasts. All other trademarks are property of their respective owners. |
|
|

  |

| FourBlades |
 Nov 26 2010, 08:45 AM Nov 26 2010, 08:45 AM
Post
#141
|
|
From Wreck to Rockin  Group: Members Posts: 2,056 Joined: 3-December 07 From: Brevard, FL Member No.: 8,414 Region Association: South East States |
That thought had occurred to me. (IMG:style_emoticons/default/pray.gif) (IMG:style_emoticons/default/pray.gif) (IMG:style_emoticons/default/pray.gif) I may actually have to use metal to build this jig so it does not warp. I spent a lot of time derusting, treating, and etching primering the innards of the tunnel. I also welded in a new accelerator tube before closing it up. These guys loved to drill big holes everywhere so I have been welding up the ones I will not need. Fortunately, I have the same size hole saw they used so I can make patches for their holes easily. John |
   |

 
|
| Hontec |
Nov 26 2010, 09:58 AM
Post
#142
|
|
I see things..... Group: Members Posts: 261 Joined: 23-September 10 From: Netherlands Member No.: 12,210 Region Association: Europe |
QUOTE(trojanhorsepower @ Nov 26 2010, 02:28 AM)  No problem, although the trip might be somewhat challenging.... (IMG:style_emoticons/default/biggrin.gif) |
|
|
|
| maf914 |
Nov 27 2010, 07:34 AM
Post
#143
|
|
Not a Guru! Group: Members Posts: 3,049 Joined: 30-April 03 From: Central Florida Member No.: 632 Region Association: None |
QUOTE(FourBlades @ Nov 26 2010, 06:45 AM) I spent a lot of time derusting, treating, and etching primering the innards of the tunnel. I also welded in a new accelerator tube before closing it up. These guys loved to drill big holes everywhere so I have been welding up the ones I will not need. Fortunately, I have the same size hole saw they used so I can make patches for their holes easily. John John, I am curious how the car suffered so much rust damage. Was it left in the open after its racing carrer ended? Salt climate? I always imagine old race cars stored in garages or warehouses, but the IMSA racer must have been somewhere wet. (IMG:style_emoticons/default/idea.gif) But, great project and great thread. Good luck and keep it going. (IMG:style_emoticons/default/welder.gif) |
|
|
|
| FourBlades |
Nov 27 2010, 08:49 AM
Post
#144
|
|
From Wreck to Rockin Group: Members Posts: 2,056 Joined: 3-December 07 From: Brevard, FL Member No.: 8,414 Region Association: South East States |
Eventually it was stored in a barn, but the front end must have been wet at some
Point for a long time. All the nooks and crannies were full of leaves and snail shells. I must have found 100 snail shells in the car. When I opened up the longs to fix A rust hole they were full of leaves. The back end of the car is in good shape for a 914. John |
|
|
|
| carr914 |
Nov 27 2010, 01:07 PM
Post
#145
|
|
Racer from Birth Group: Members Posts: 124,687 Joined: 2-February 04 From: Tampa,FL Member No.: 1,623 Region Association: South East States |
QUOTE(maf914 @ Nov 27 2010, 08:34 AM) QUOTE(FourBlades @ Nov 26 2010, 06:45 AM) I am curious how the car suffered so much rust damage. Was it left in the open after its racing carrer ended? Salt climate? I always imagine old race cars stored in garages or warehouses, but the IMSA racer must have been somewhere wet. (IMG:style_emoticons/default/idea.gif) When I found it was in a Barn (really) with some other rusty cars ( Ferrari, Alfa, Renault). The guy was a real car guy and former racer, so I think he just had a thing for cool old cars that just happened to be rusty. Prior to that it was in Miami ( lots of salt air) and didn't look like anything had happened since it last came off the track. I think it must have been stored outside, maybe under a carport. The more that I see of it, the more I wish I had kept, but John has the skills to weld (IMG:style_emoticons/default/welder.gif) that I don't have T.C. |
|
|
|
| FourBlades |
Nov 29 2010, 07:15 PM
Post
#146
|
|
From Wreck to Rockin Group: Members Posts: 2,056 Joined: 3-December 07 From: Brevard, FL Member No.: 8,414 Region Association: South East States |
Built a jig out of scrap tubing to locate the front suspension points.
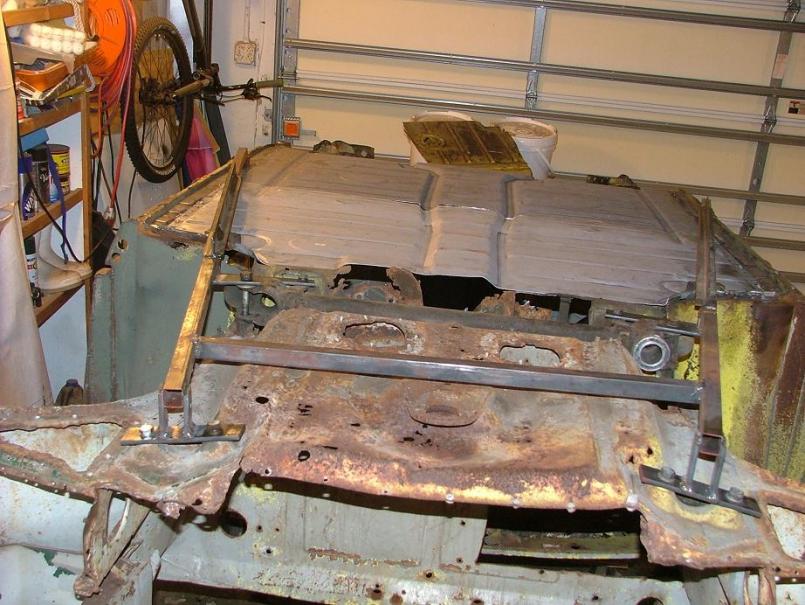 The jig is welded to the longs and floor pans. It is reinforced with some angle iron to keep it from bending vertically. 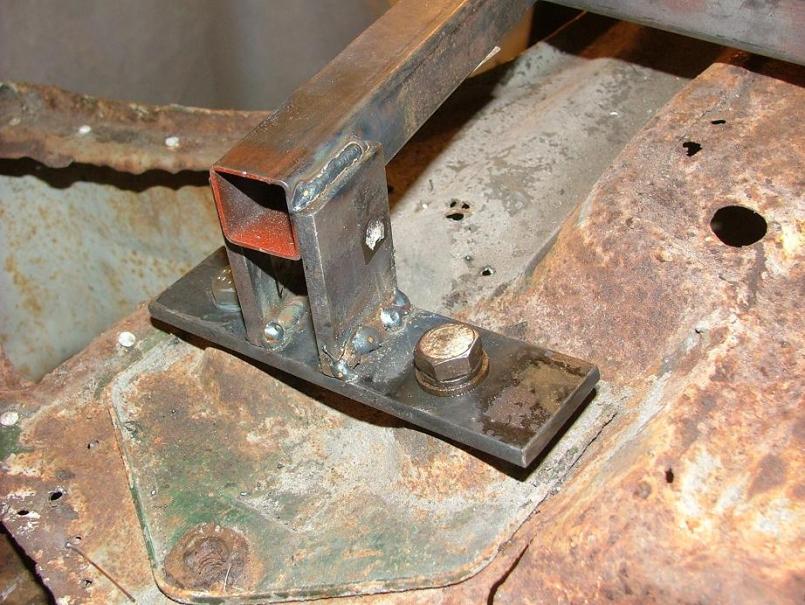 I measured the suspension location points and they look like they are pretty good. The jig was built using plates bolted to the suspension points. I left the front cross member in because it does a good job of maintaining the relative locations of 4 of the suspension points. 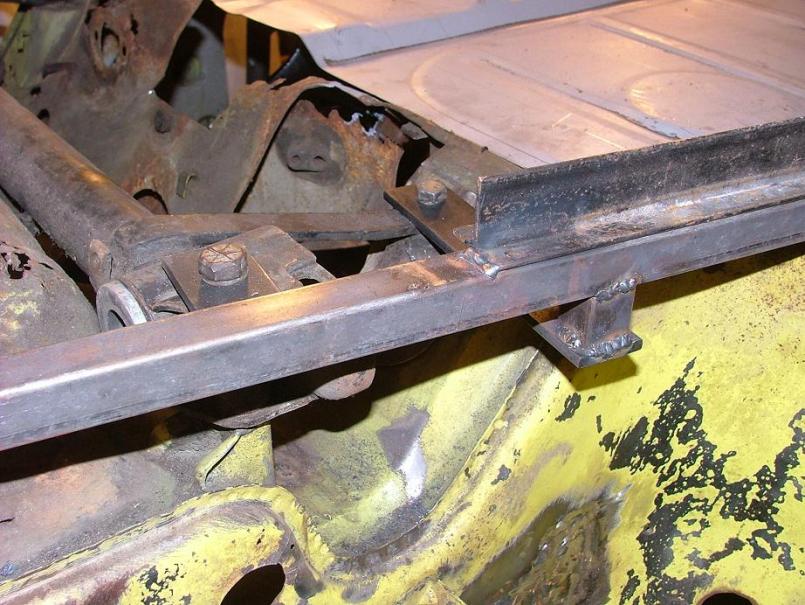 I welded the plates connecting to the suspension points last to minimize any of the other welding warping it and moving their locations. John |
|
|
|
| FourBlades |
Nov 29 2010, 07:27 PM
Post
#147
|
|
From Wreck to Rockin Group: Members Posts: 2,056 Joined: 3-December 07 From: Brevard, FL Member No.: 8,414 Region Association: South East States |
It is not pretty but I think it will do the job. It will only be in place about a week
or two.  Started cutting out the middle of the car up to the new floor pans. 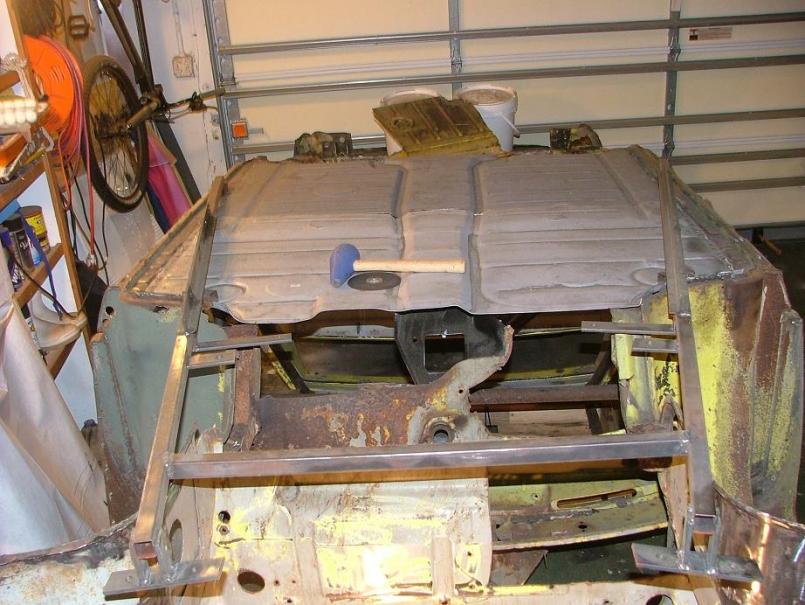 Cut out the head light bucket that was badly rusted. Started cleaning up the metal underneath to see what shape it was in.  The piece Terry (914xprs) sent me is in great shape with just a little surface rust. He cut it perfectly up to where the replacement floors start. 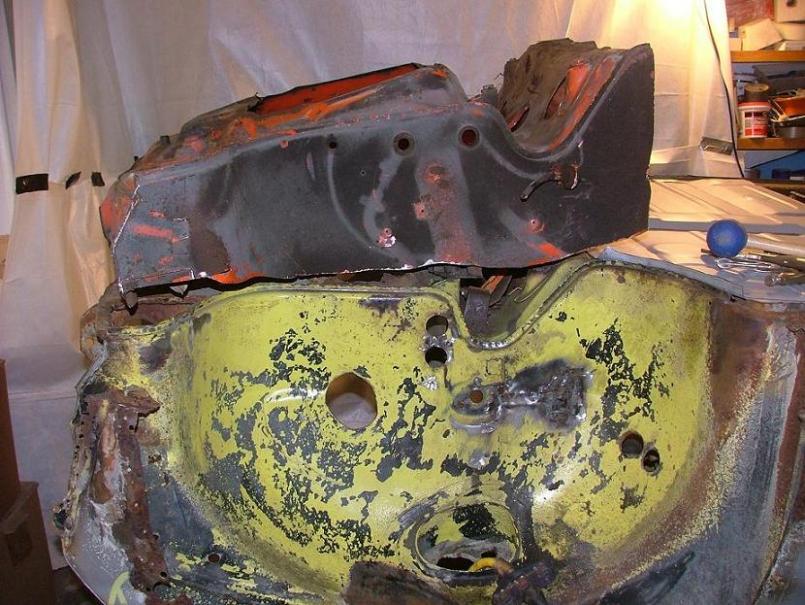 The plan is to remove the center of the old car and replace it with the new piece. I need to trim the car up to the pinch welds and the remove the opposite pieces from the replacement. This is major transplant surgery but it will restore the car to good metal in some critical areas. John |
|
|
|
| McMark |
Nov 29 2010, 07:47 PM
Post
#148
|
|
914 Freak! Group: Retired Admin Posts: 20,179 Joined: 13-March 03 From: Grand Rapids, MI Member No.: 419 Region Association: None |
Doing these huge panels can be so daunting before starting. But it really is satisfying to bring a trashed chassis back from the brink of death, and in retrospect it's never really that big of a job. (Isn't everything easier in retrospect?)
(IMG:style_emoticons/default/first.gif) |
|
|
|
| FourBlades |
Nov 29 2010, 07:52 PM
Post
#149
|
|
From Wreck to Rockin Group: Members Posts: 2,056 Joined: 3-December 07 From: Brevard, FL Member No.: 8,414 Region Association: South East States |
Mark,
Yeah, its easy! Why don't you fly out this weekend and help me put it in? (IMG:style_emoticons/default/biggrin.gif) Actually, for you, I am sure it would be easy after building the limo... (IMG:style_emoticons/default/welder.gif) I must admit I spent a lot of time pondering how much to transplant before figuring it would be best to do as much as possible in one chunk. John |
|
|
|
| Hontec |
Nov 30 2010, 04:39 AM
Post
#150
|
|
I see things..... Group: Members Posts: 261 Joined: 23-September 10 From: Netherlands Member No.: 12,210 Region Association: Europe |
John
Are you going to replace parts along the original spotweld seams or are you going to cut up the old chassis to fit in the new part as it is? Randall |
|
|
|
| FourBlades |
Nov 30 2010, 06:28 AM
Post
#151
|
|
From Wreck to Rockin Group: Members Posts: 2,056 Joined: 3-December 07 From: Brevard, FL Member No.: 8,414 Region Association: South East States |
Randall,
I am going to replace it along the spot weld seams down the sides. This should help with lining up the new piece accurately. The two bulkheads and floors will get joined in the middle of the panels. John |
|
|
|
| Hontec |
Nov 30 2010, 08:01 AM
Post
#152
|
|
I see things..... Group: Members Posts: 261 Joined: 23-September 10 From: Netherlands Member No.: 12,210 Region Association: Europe |
QUOTE(FourBlades @ Nov 30 2010, 01:28 PM) Randall, I am going to replace it along the spot weld seams down the sides. This should help with lining up the new piece accurately. The two bulkheads and floors will get joined in the middle of the panels. John That is indeed the best way, I was going to say if you would weld in the new piece like it lays on top of the old one, which would mean you'd have to cut out half of the inner fender along a long straight line, My advise would be to not cut in a straight line but make it stepped, gives a hell of a lot more shear strength.. |
|
|
|
| FourBlades |
Nov 30 2010, 09:50 AM
Post
#153
|
|
From Wreck to Rockin Group: Members Posts: 2,056 Joined: 3-December 07 From: Brevard, FL Member No.: 8,414 Region Association: South East States |
That would make a lot of sense. I am not a big fan of long butt welds in the middle
of panels when it comes to structural strength. I am going to be adding some tubing from the front shock towers to the front suspension points, and tie these tubes together across the front of the car similar to how Jeff Hail did in his "Bringing out the dead" thread. I would be worried about the strength of the front of the car after all this surgery without these tubes. This picture was "borrowed" from Jeff's thread. 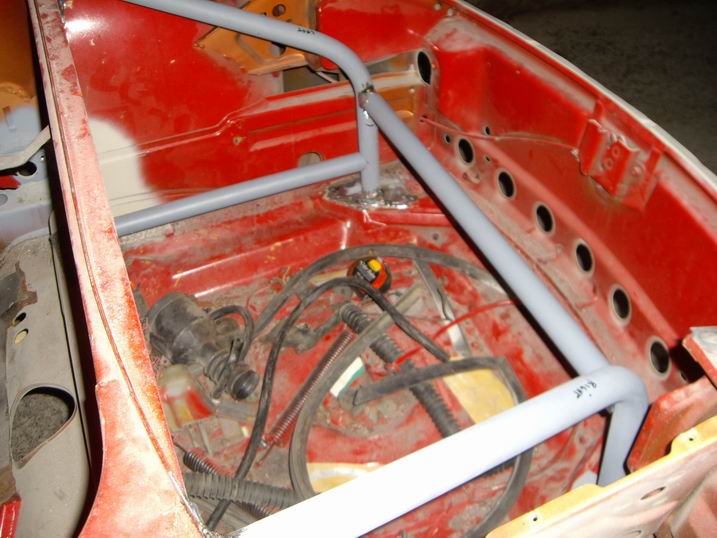 John |
|
|
|
| Hontec |
Nov 30 2010, 10:51 AM
Post
#154
|
|
I see things..... Group: Members Posts: 261 Joined: 23-September 10 From: Netherlands Member No.: 12,210 Region Association: Europe |
Good idea!! form and fuction.......looks really good...
|
|
|
|
| FourBlades |
Nov 30 2010, 08:18 PM
Post
#155
|
|
From Wreck to Rockin Group: Members Posts: 2,056 Joined: 3-December 07 From: Brevard, FL Member No.: 8,414 Region Association: South East States |
Spent 2 hours peeling off one side of the donor organ. This is the first time I used
the Blair Rotabroach. These things kick ass. I won't go back to anything else. They are much more aggressive cutting and stay sharp better than any of the other spot weld bits I have tried. 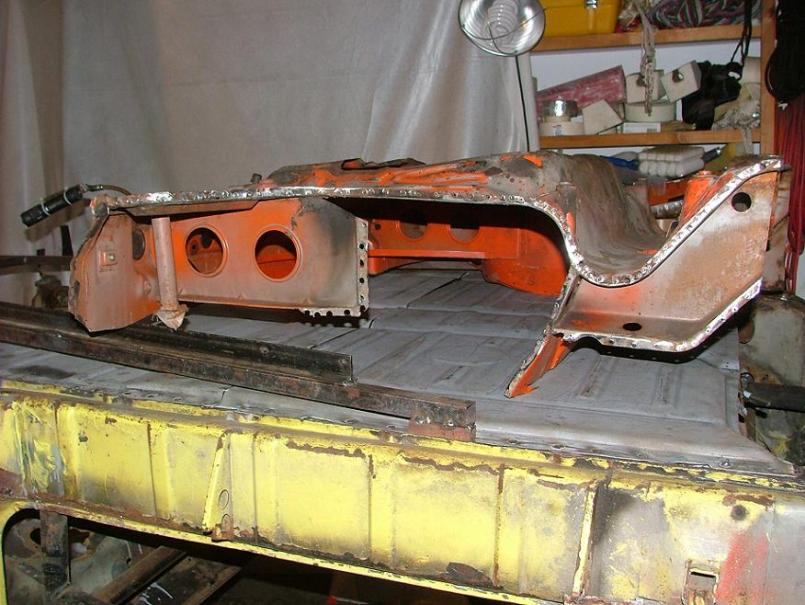 Still a lot of work left before the transplant can happen. John |
|
|
|
| Eric_Shea |
Nov 30 2010, 10:37 PM
Post
#156
|
|
PMB Performance Group: Admin Posts: 19,301 Joined: 3-September 03 From: Salt Lake City, UT Member No.: 1,110 Region Association: Rocky Mountains |
That's a good "pick". Prep is everything. (IMG:style_emoticons/default/smilie_pokal.gif)
|
|
|
|
| PeeGreen 914 |
Nov 30 2010, 11:03 PM
Post
#157
|
|
Just when you think you're done...wait, there is more..lol Group: Members Posts: 10,219 Joined: 21-September 06 From: Seattle, WA... actually Everett Member No.: 6,884 Region Association: Pacific Northwest |
Nice work (IMG:style_emoticons/default/smile.gif)
|
|
|
|
| arkitect |
Dec 1 2010, 08:57 PM
Post
#158
|
|
Senior Member Group: Members Posts: 617 Joined: 3-March 10 From: Stockton, CA Member No.: 11,426 Region Association: None |
John,
Just found your build thread, cool project, you do good work. I am always amazed at the innovative ways you come up with of turning a 914 upside down. Keep the picts coming. Dave |
|
|
|
| ChrisFoley |
Dec 1 2010, 09:23 PM
Post
#159
|
|
I am Tangerine Racing Group: Members Posts: 7,981 Joined: 29-January 03 From: Bolton, CT Member No.: 209 Region Association: None |
You'll have a fuel cell and oil cooler to install as soon as you get the trunk reconstructed and the chassis flipped upright again John.
Here's what it looks like mocked up. The tubular braces will be ready shortly. Everything appears to fit together just fine. I have most of your fuel plumbing together now and the cooler/shroud shipped today. We plumbed a similar oil cooler installation over the last couple days for a 3.2L conversion, so I have many details already worked out. 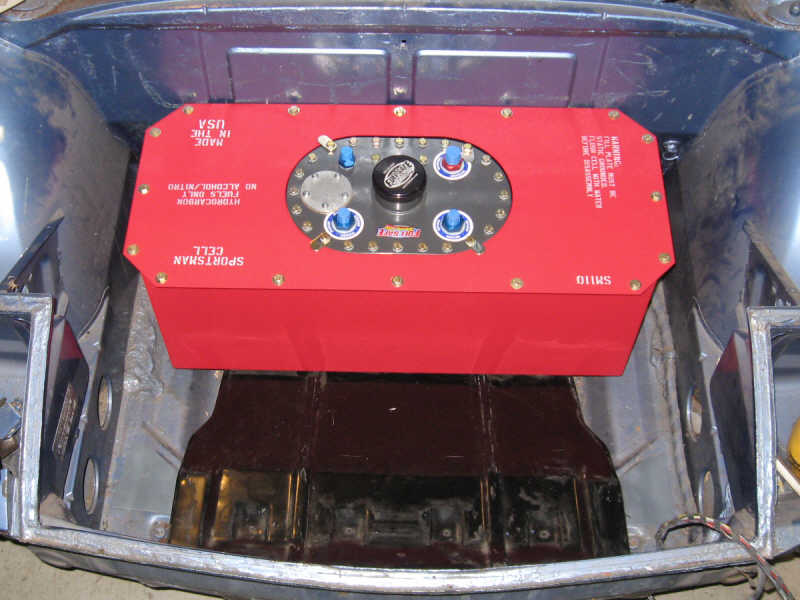 |
|
|
|
| watsonrx13 |
Dec 2 2010, 06:59 AM
Post
#160
|
|
Advanced Member Group: Members Posts: 2,735 Joined: 18-February 03 From: Plant City, FL Member No.: 312 Region Association: South East States |
Great job John... (IMG:style_emoticons/default/aktion035.gif)
BTW what size Blair Rotabroach bit did you use? -- Rob |
|
|
|
|
1 User(s) are reading this topic (1 Guests and 0 Anonymous Users)
0 Members:

|
Lo-Fi Version | Time is now: 27th April 2025 - 03:25 PM |
Invision Power Board
v9.1.4 © 2025 IPS, Inc.