|
|
|
Porsche, and the Porsche crest are registered trademarks of Dr. Ing. h.c. F. Porsche AG.
This site is not affiliated with Porsche in any way. Its only purpose is to provide an online forum for car enthusiasts. All other trademarks are property of their respective owners. |
|
|

  |

| FourBlades |
 Apr 6 2012, 08:24 AM Apr 6 2012, 08:24 AM
Post
#281
|
|
From Wreck to Rockin  Group: Members Posts: 2,056 Joined: 3-December 07 From: Brevard, FL Member No.: 8,414 Region Association: South East States |
QUOTE(URY914 @ Apr 3 2012, 07:56 PM)  John, Don't know if you knew about this video but your car is shown at about the 12:21 mark and 14:46. Sebring 12 Hours 1977... http://www.youtube.com/watch?v=4kks-yGG_6g That is awesome, never seen that movie before! John |
   |

 
|
| ThePaintedMan |
Apr 6 2012, 10:26 AM
Post
#282
|
|
Advanced Member Group: Members Posts: 3,887 Joined: 6-September 11 From: St. Petersburg, FL Member No.: 13,527 Region Association: South East States |
That video was awesome! So cool to see your car in there John!
|
|
|
|
| maf914 |
Apr 8 2012, 10:59 AM
Post
#283
|
|
Not a Guru! Group: Members Posts: 3,049 Joined: 30-April 03 From: Central Florida Member No.: 632 Region Association: None |
QUOTE(URY914 @ Apr 3 2012, 06:56 PM) John, Don't know if you knew about this video but your car is shown at about the 12:21 mark and 14:46. Sebring 12 Hours 1977... http://www.youtube.com/watch?v=4kks-yGG_6g Paul, Thanks for linking that video. Great stuff! And we bitch about today's coverage of sports car racing! (IMG:style_emoticons/default/laugh.gif) |
|
|
|
| URY914 |
Apr 8 2012, 06:49 PM
Post
#284
|
|
I built the lightest 914 in the history of mankind. Group: Members Posts: 126,249 Joined: 3-February 03 From: Jacksonville, FL Member No.: 222 Region Association: None |
QUOTE(maf914 @ Apr 8 2012, 09:59 AM) QUOTE(URY914 @ Apr 3 2012, 06:56 PM) John, Don't know if you knew about this video but your car is shown at about the 12:21 mark and 14:46. Sebring 12 Hours 1977... http://www.youtube.com/watch?v=4kks-yGG_6g Paul, Thanks for linking that video. Great stuff! And we bitch about today's coverage of sports car racing! (IMG:style_emoticons/default/laugh.gif) It pays to do a Youtube search every few months. Kinda like fishing. Sometimes nothing; sometimes you get one. |
|
|
|
| FourBlades |
Apr 22 2012, 08:01 PM
Post
#285
|
|
From Wreck to Rockin Group: Members Posts: 2,056 Joined: 3-December 07 From: Brevard, FL Member No.: 8,414 Region Association: South East States |
I decided to build a sheet metal oil cooler shroud so I could make the top in two
pieces. This will allow the oil cooler to be cleaned out or replaced with the bracing tubes welded in place. Spent a long time making an ugly looking template for a side. I copied the shape of the fiberglass oil cooler shroud. I had to add tape to several edges where I cut too much off to start with. 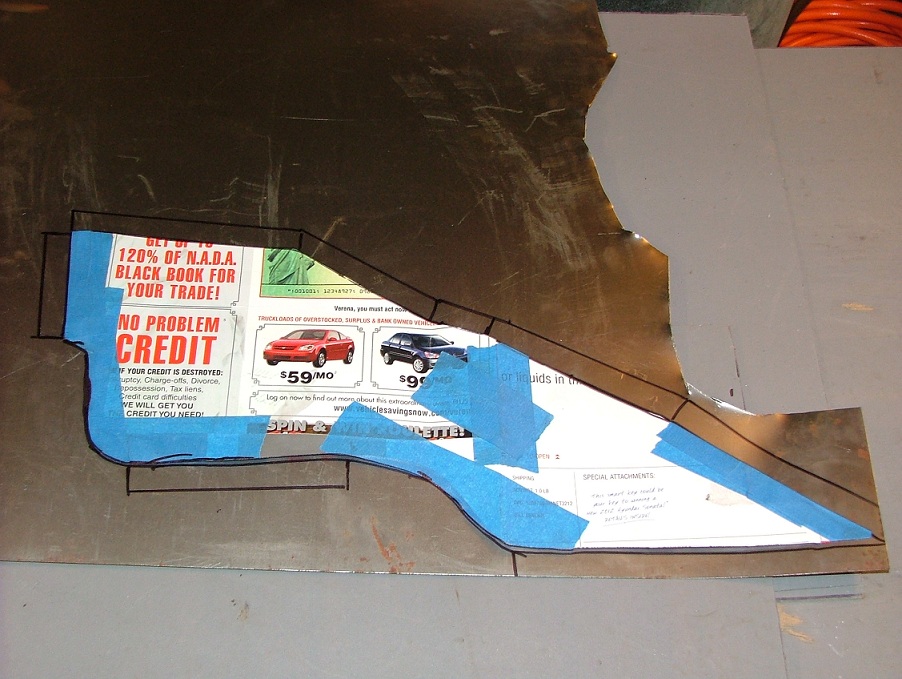 First side bent up and fitted. 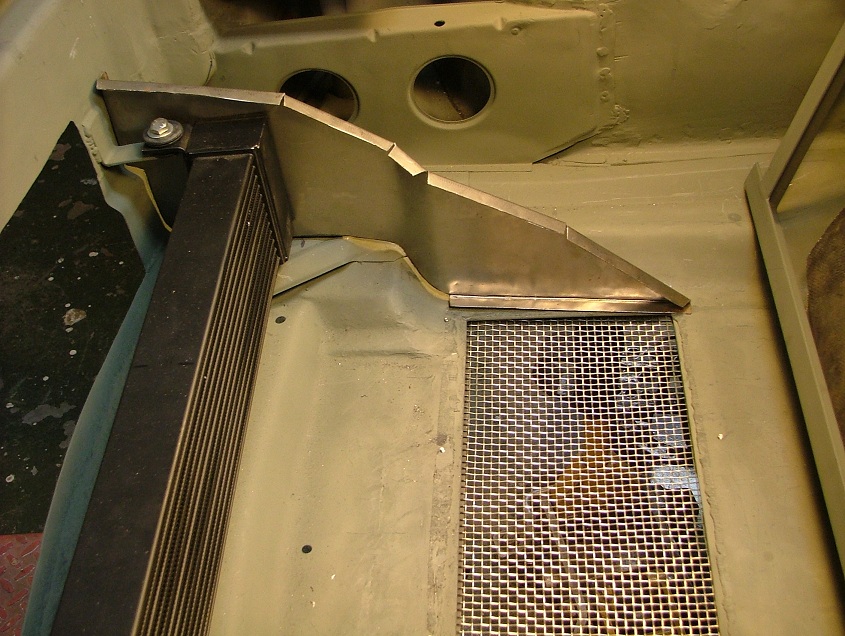 Bending up the second side. These pliers are really useful for this kind of work and you can buy them at Home Depot, etc. 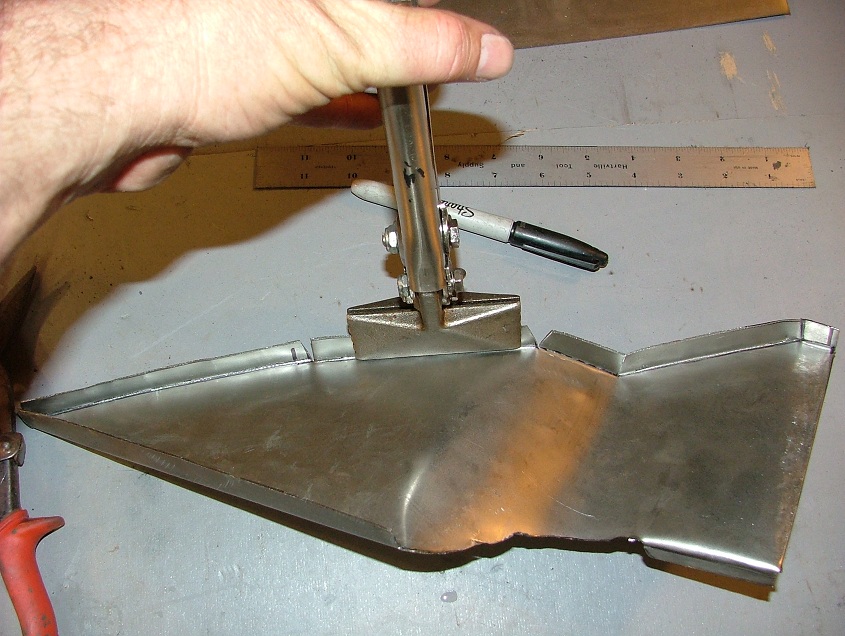 Hammering on the bend to make it crisper. 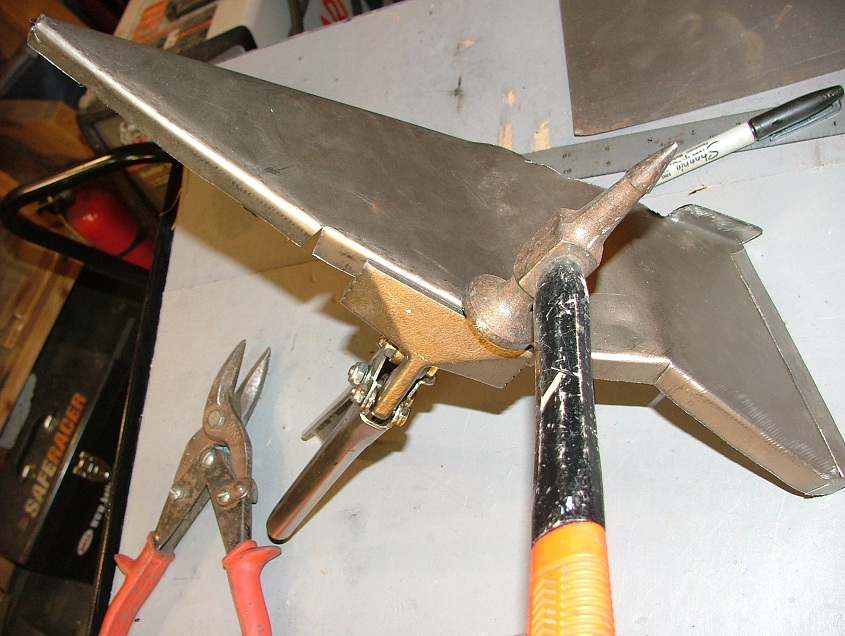 Both sides screwed down.  Laying out the first top piece. 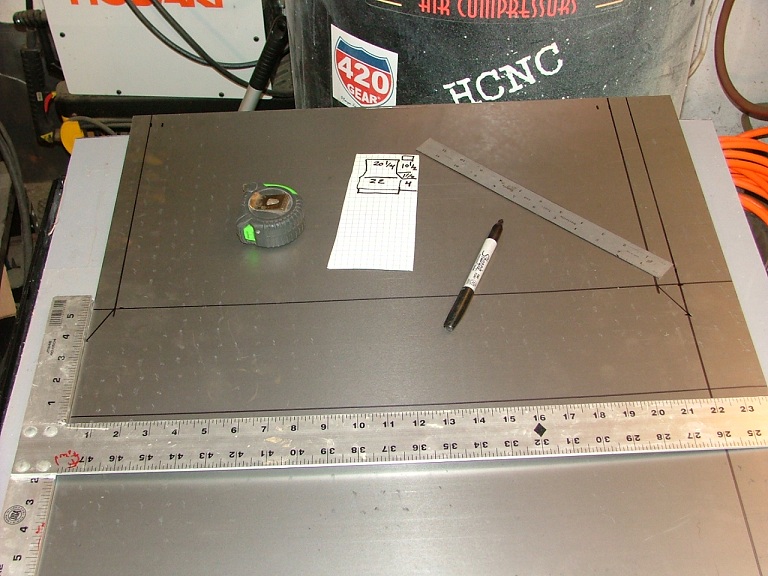 Cut it out with the power sheers. They tend to get hung up sometimes and screw up your cuts. I had to straighten out some of these edges with the grinder. 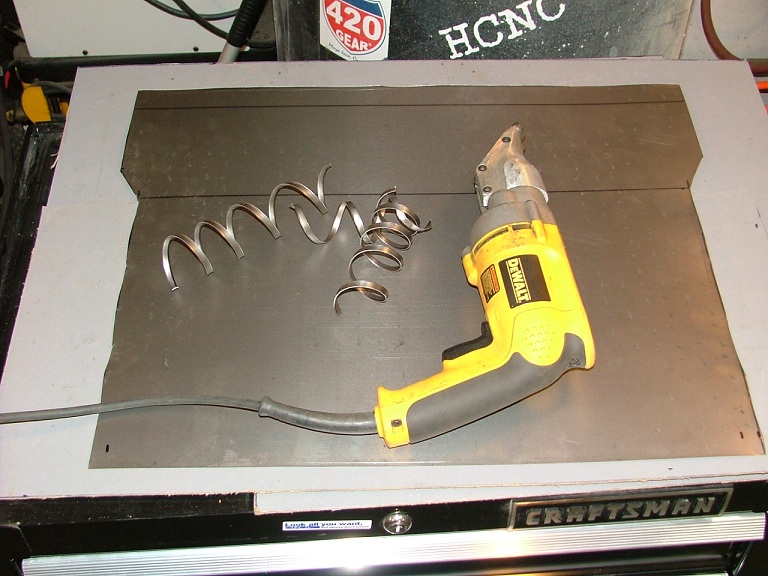 Screwed it together. 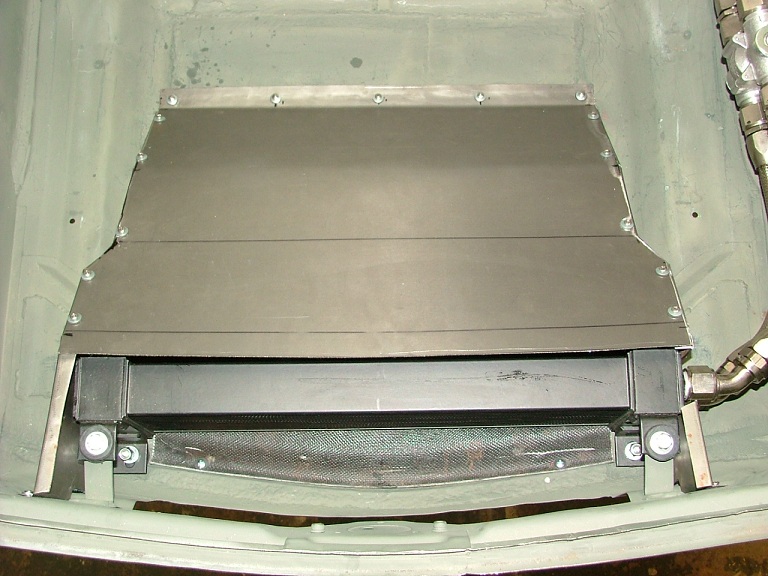 It turned out pretty well. I will replace the sheet metal screws with welded nuts later on. 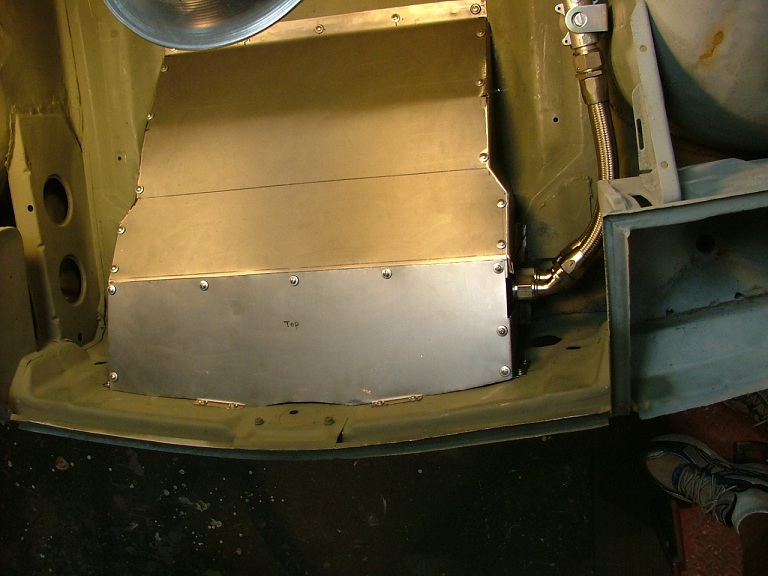 This took several days but I am glad I took the time to do it. John |
|
|
|
| FourBlades |
Apr 22 2012, 08:10 PM
Post
#286
|
|
From Wreck to Rockin Group: Members Posts: 2,056 Joined: 3-December 07 From: Brevard, FL Member No.: 8,414 Region Association: South East States |
Continued work on mounting the fuel cell. Following the approach used by several
fuel cell makers to strap down a cell. Bent up some 1 1/4 by 1/8 steel strips. 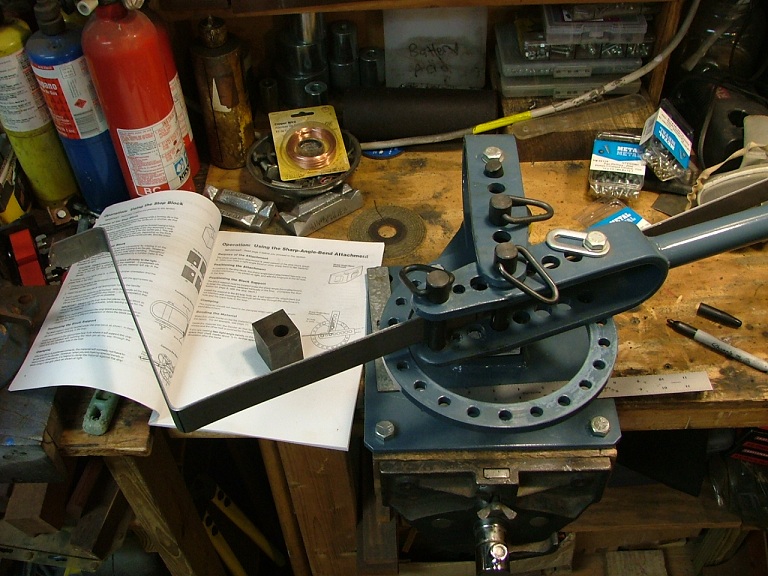 The straps go all the way around the fuel cell and the frame on which it sits. Bolted through the lip of the cell at the top. The frame the fuel cell is sitting in is a welded rectangle of one inch angle iron. The straps will be welded to the frame on the bottom. A additional angle will be used to bolt the back lip to the bulkhead. 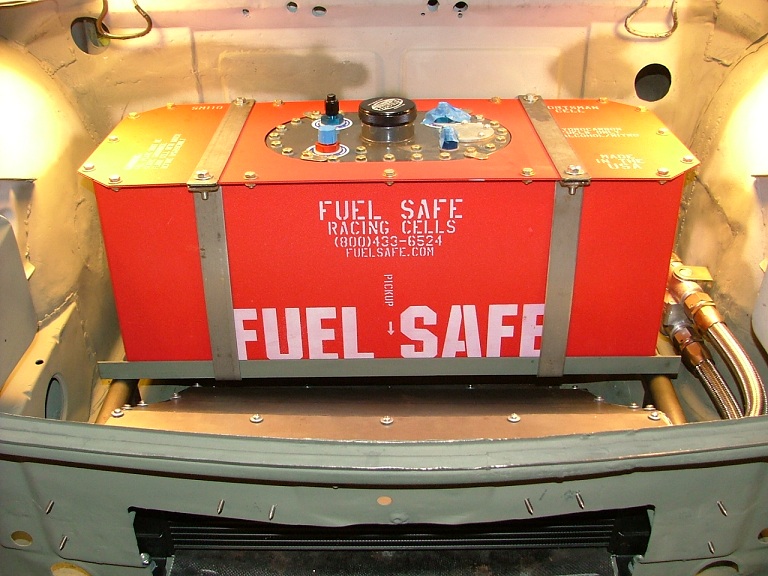 John |
|
|
|
| FourBlades |
Jul 1 2012, 12:55 PM
Post
#287
|
|
From Wreck to Rockin Group: Members Posts: 2,056 Joined: 3-December 07 From: Brevard, FL Member No.: 8,414 Region Association: South East States |
Tired of the endless work on the front end, I decided to fix some holes in the engine bay including the hell hole.
Notice the long is cracked in the rear wheel arch. This is the kind of crack the GT stiffening kit is meant to prevent. Interesting that it cracked even with (or maybe because of) the bars tying into the rear shock towers. 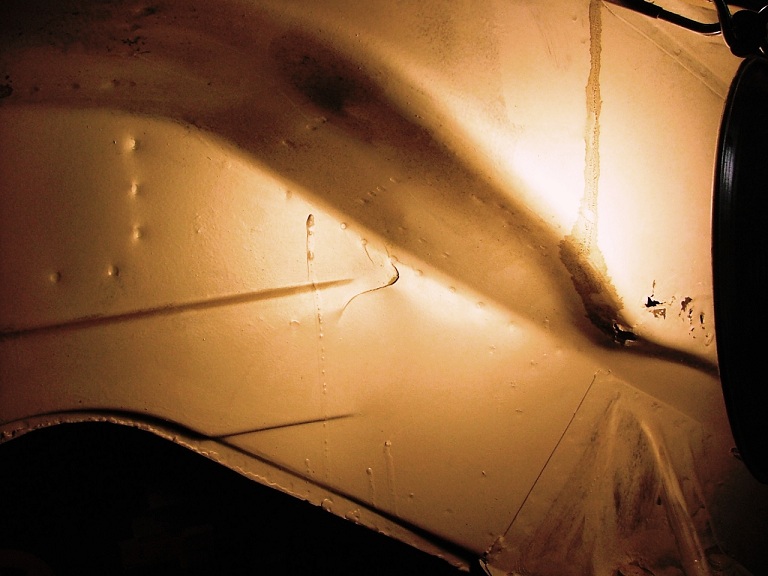 Cut out rusted metal where the battery tray attaches on the other side. 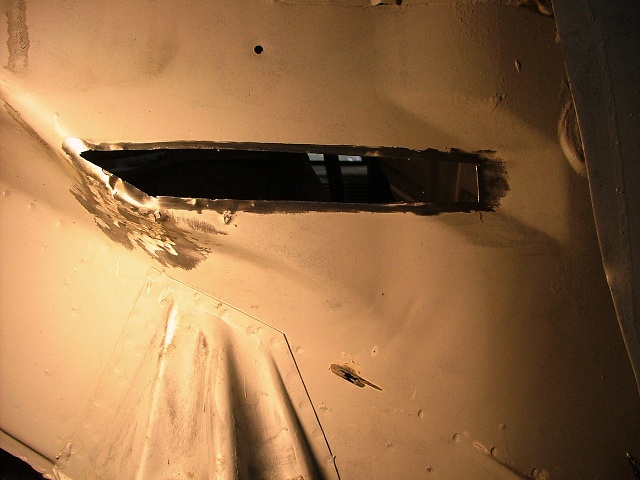 Make a template by sticking painters tape over the hole from the other side. Attached image(s) 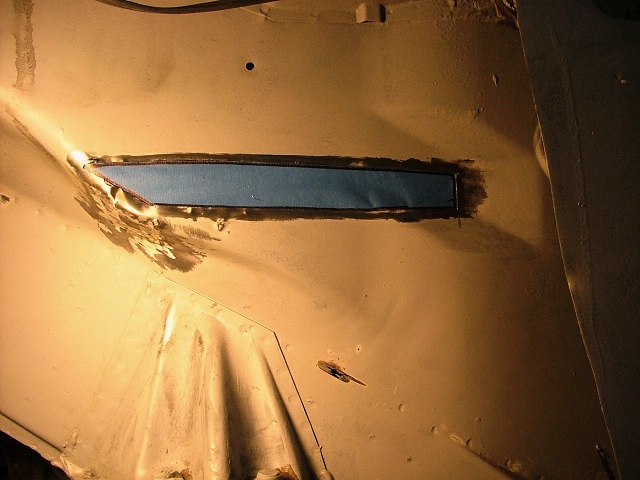
|
|
|
|
| FourBlades |
Jul 1 2012, 01:09 PM
Post
#288
|
|
From Wreck to Rockin Group: Members Posts: 2,056 Joined: 3-December 07 From: Brevard, FL Member No.: 8,414 Region Association: South East States |
Stick the tape to a piece of metal and cut it out. Easy to get a good fit this way.
Tack it being careful to align the edges perfectly flat. If the patch sticks in or out by any appreciable amount it is impossible to grind the seam flat. 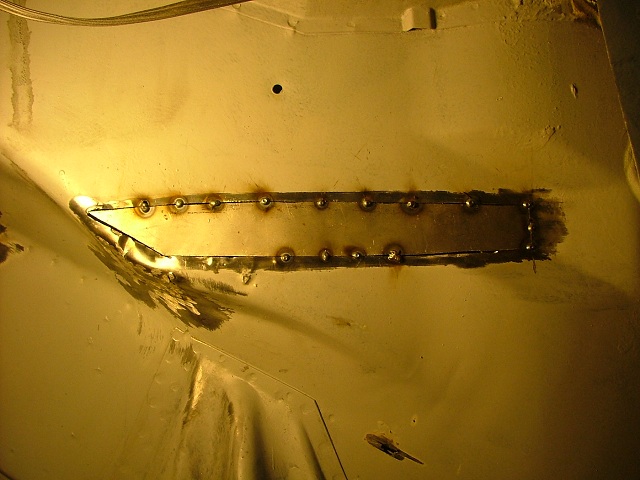 Keep adding tacks until it is fully welded. Notice the burns and dirt around each tack weld. Once this side is fully welded, I turn up my welder and hit any parts of the other side that did not burn through fully. Doing this before grinding the first side gives more metal to absorb the weld heat. 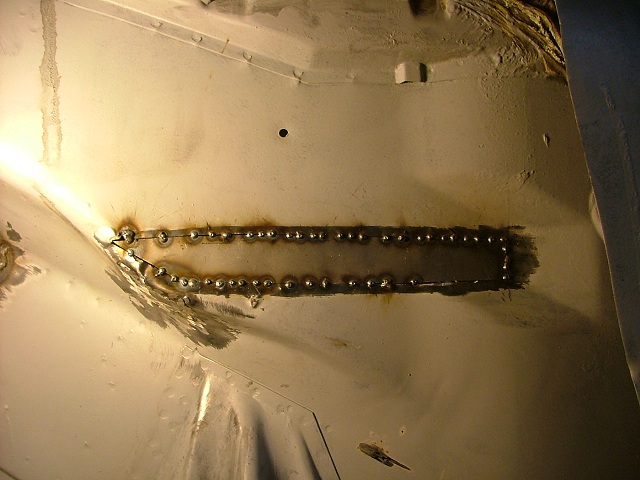 Every time I do this I learn something more. This time I stopped now and then and wire wheeled the seam to clean the spatter from previous sets of tacks. This seems to keep the popping and blow through down. 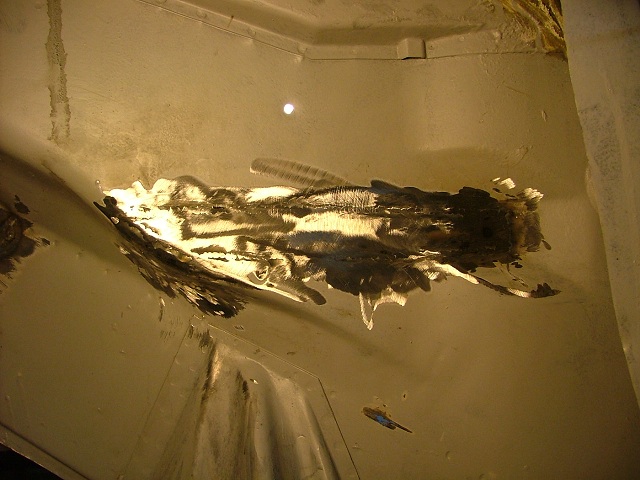 Made a 16 gauge patch for the hell hole. This is trickier to make than it looks because of the bends and the way the long curves. Welded some backers to the top and bottom to help align the patch and allow a hotter weld seam there. Makes it much easier to fix an area where you can't access the back.  Welded and ground down. 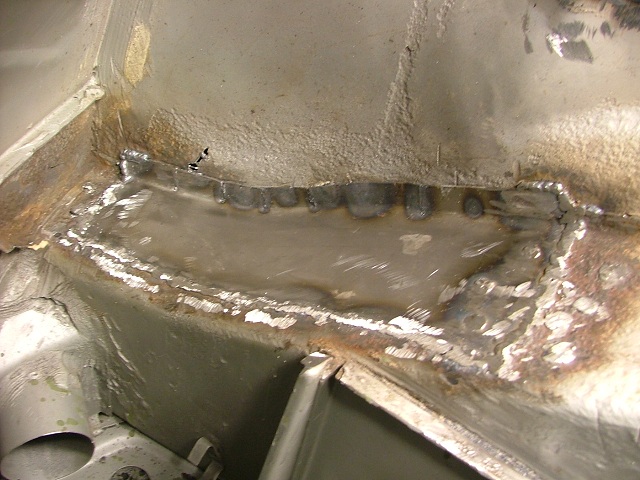 The bodywork on this car is just never ending...there is still more. John |
|
|
|
| bcheney |
Jul 1 2012, 01:54 PM
Post
#289
|
|
Senior Member Group: Members Posts: 1,341 Joined: 16-November 03 From: Orlando, FL Member No.: 1,348 Region Association: South East States |
Very nice work John. I love checking in on your project and seeing what you fab up next. Keep up the great work!
|
|
|
|
| FourBlades |
Jul 1 2012, 02:12 PM
Post
#290
|
|
From Wreck to Rockin Group: Members Posts: 2,056 Joined: 3-December 07 From: Brevard, FL Member No.: 8,414 Region Association: South East States |
Thanks Brian, I am ready for the mechanical assembly but there is a lot of bodywork still to do... John |
|
|
|
| ThePaintedMan |
Jul 1 2012, 08:38 PM
Post
#291
|
|
Advanced Member Group: Members Posts: 3,887 Joined: 6-September 11 From: St. Petersburg, FL Member No.: 13,527 Region Association: South East States |
John,
You're metal work continues to impress me and gets better and better. The shroud looks killer. My main area of focus is body work, so let me know if you would like some free labor! BTW - I got the Tangerine kit installed today. Its a different car now. Thank you, thank you again. I'll post pics soon. |
|
|
|
| FourBlades |
Jul 14 2012, 03:34 PM
Post
#292
|
|
From Wreck to Rockin Group: Members Posts: 2,056 Joined: 3-December 07 From: Brevard, FL Member No.: 8,414 Region Association: South East States |
Hey George, glad the parts helped out. I am going to want some help when the
epic reassembly of this car finally arrives. (IMG:style_emoticons/default/smash.gif) (IMG:style_emoticons/default/beer.gif) My trusty dewalt grinder quit on me the other day after 5 years and 2 cars of fearless grinding. I was wondering what the deal was until I noticed the cord was on fire near the body of the grinder. (IMG:style_emoticons/default/biggrin.gif) Put out the fire and installed a new cord and its back on the job. Fixing the tail. The sheet metal underneath the old fiberglass fenders is in really bad shape. All chewed up and distorted. It looks like the builders bashed in the fenders as needed and filled them with glass. I fixed a bunch of pin holes and cracks in addition to this work. I don't really want to buy replacement steel rear fenders, which have to be getting rare, just to cut most of them off. When I get the new fiberglass ones I'll decide what I am going to do. Making these decisions is not easy and involves a lot of angst. Already built up the bottom of the corner with a few bits. 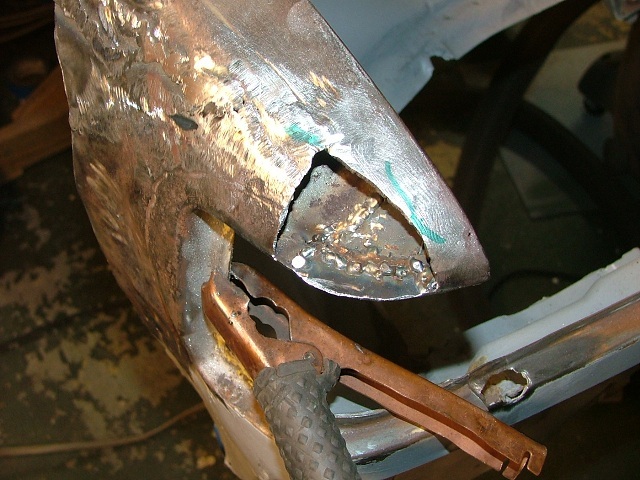 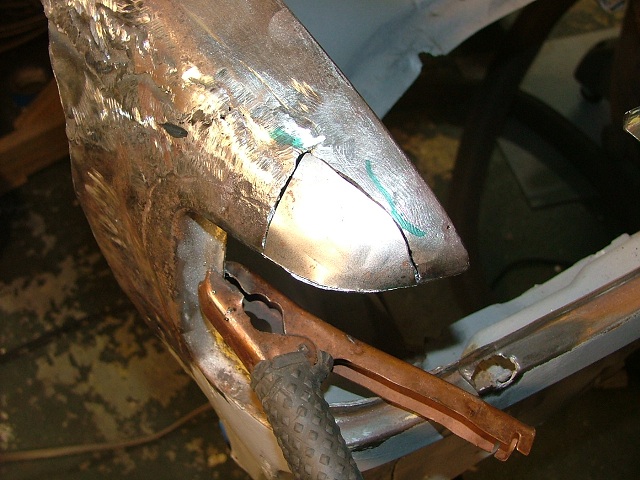 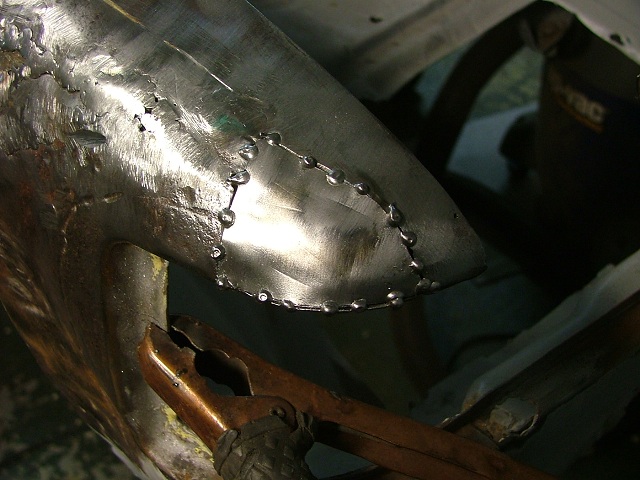 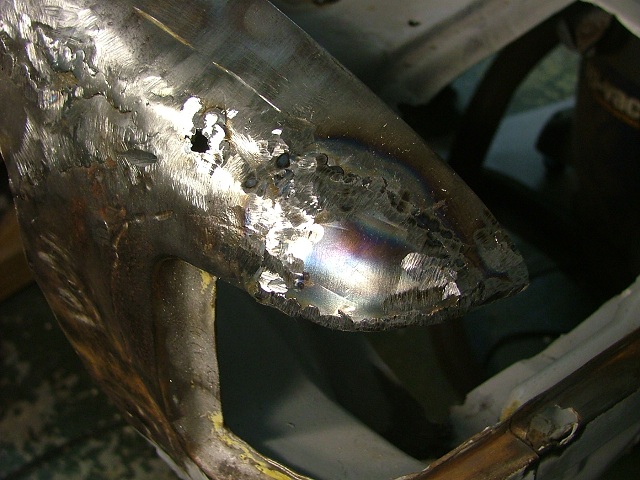 Fixed some more cracks and holes after this. John |
|
|
|
| FourBlades |
Jul 14 2012, 03:38 PM
Post
#293
|
|
From Wreck to Rockin Group: Members Posts: 2,056 Joined: 3-December 07 From: Brevard, FL Member No.: 8,414 Region Association: South East States |
Fixing the taillight area.
Sketch out the new piece. 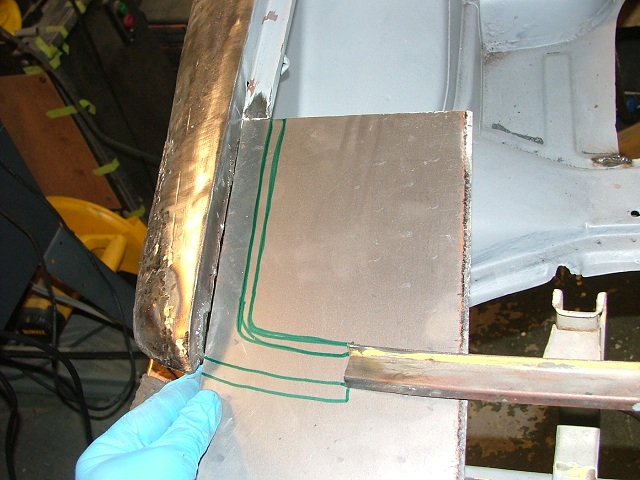 Cut n bend. 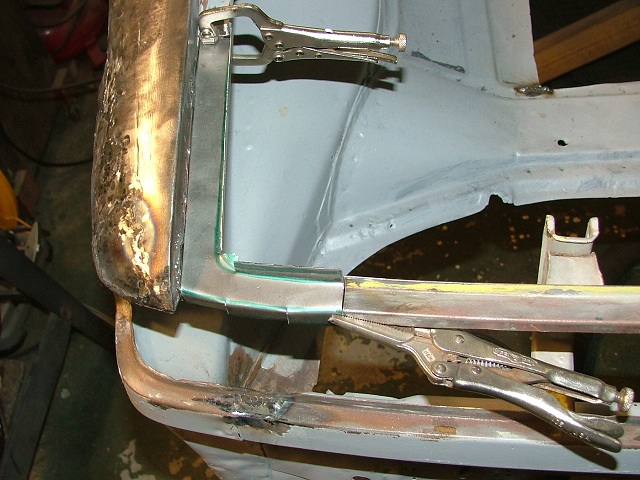 Weld n grind. 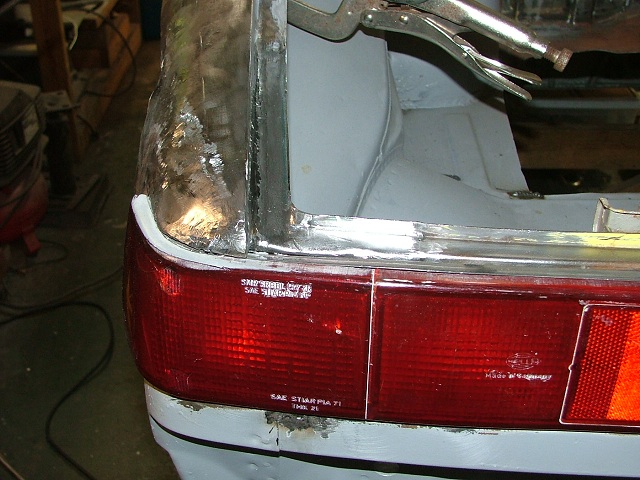 Fits decent. The front corner of the fender is pretty tweaked so it is not perfect. Losing patience with how bad the metal is on the fenders so calling it a day. John |
|
|
|
| FourBlades |
Jul 14 2012, 03:57 PM
Post
#294
|
|
From Wreck to Rockin Group: Members Posts: 2,056 Joined: 3-December 07 From: Brevard, FL Member No.: 8,414 Region Association: South East States |
Switching gears here to work on something besides welding and grinding.
I have asked some of the experienced folks what kind of seats to run in the car. They have given me some great ideas and I hate to keep bothering the same people all the time so I thought I would throw this out for the world to help me out. I would like to race the car in vintage racing, do some DEs, and maybe some vintage rallys. The Targa Newfoundland is my fantasy goal. I can either use a vintage looking seat, like this great aluminum Kirkey 41500 vintage seat. 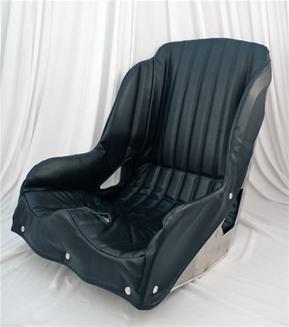 A less vintage looking seat but one that is probably safer would be this Kirkey 47500 seat. 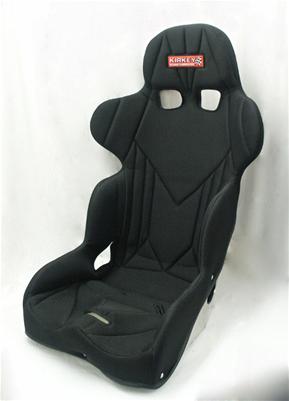 Don't be shy now what do you all think? John |
|
|
|
| kshighlander |
Jul 14 2012, 04:01 PM
Post
#295
|
|
Newbie Group: Members Posts: 16 Joined: 19-May 11 From: Kansas City Member No.: 13,090 Region Association: None |
Go for safety over looks in that dept. I vote!
|
|
|
|
| ThePaintedMan |
Jul 14 2012, 04:20 PM
Post
#296
|
|
Advanced Member Group: Members Posts: 3,887 Joined: 6-September 11 From: St. Petersburg, FL Member No.: 13,527 Region Association: South East States |
I'm really getting into SVRA and historics and from what I know, no one looks down upon modern safety equipment. Fuel cells, HANS devices and seats are just some of the many areas that people upgrade with good reason. I vote the tall seat-back. I sincerely doubt if you were to track it at all that you would be able to get by with the low-back. Not to mention, its just a bad idea in general I think. The fender work looks awesome! Are you going to try your hand at a shrinking disc to smooth out the rest of it, since you're planning on FG fenders at some point?
|
|
|
|
| FourBlades |
Jul 14 2012, 04:40 PM
Post
#297
|
|
From Wreck to Rockin Group: Members Posts: 2,056 Joined: 3-December 07 From: Brevard, FL Member No.: 8,414 Region Association: South East States |
I have heard great things about shrinking disks and have John's video where he demonstrates it. I also heard from people whose disk exploded and sent them to the hospital with major injuries. I have not had much luck shrinking with acetylene but I may try again. Keep the ideas coming. (IMG:style_emoticons/default/piratenanner.gif) John |
|
|
|
| carr914 |
Jul 14 2012, 05:25 PM
Post
#298
|
|
Racer from Birth Group: Members Posts: 124,689 Joined: 2-February 04 From: Tampa,FL Member No.: 1,623 Region Association: South East States |
John, I have a Sparco Racing Seat with Recaro Brackets that came out of the Carrera if you want a Real Racing Seat ( Cheap)
DS  |
|
|
|
| MikeSpraggi |
Jul 14 2012, 07:40 PM
Post
#299
|
|
Senior Member Group: Members Posts: 781 Joined: 7-February 05 From: Silver Spring, Md Member No.: 3,570 Region Association: MidAtlantic Region |
You'll need the tall seat for racing the 914 ... even just vinatage.
|
|
|
|
| FourBlades |
Jul 21 2012, 10:51 AM
Post
#300
|
|
From Wreck to Rockin Group: Members Posts: 2,056 Joined: 3-December 07 From: Brevard, FL Member No.: 8,414 Region Association: South East States |
People must use the short vintage seat in street cars. (IMG:style_emoticons/default/confused24.gif)
After combing this site and the internet in general for days I have concluded that I need Roger Sheridan's wide rear body flares. They look the closest to the original flares that I can find and they are wide enough to fit the Gottis I want to use. The rear tires on the Gottis are around 13.5" wide. That is too wide for the Sheridan standard rear flares. Now I have to figure out what size wheel spacer to make the Gottis work. I found some other really wide rear flares but they have a hard body line in them that does not match the originals or they have big vent holes. I also do not want to use 914 GT style rear flares because that is not what was on the car. Anyone know of any other potential choice? Thanks, John |
|
|
|
|
2 User(s) are reading this topic (2 Guests and 0 Anonymous Users)
0 Members:

|
Lo-Fi Version | Time is now: 28th April 2025 - 09:35 PM |
Invision Power Board
v9.1.4 © 2025 IPS, Inc.