|
|

|
Porsche, and the Porsche crest are registered trademarks of Dr. Ing. h.c. F. Porsche AG.
This site is not affiliated with Porsche in any way. Its only purpose is to provide an online forum for car enthusiasts. All other trademarks are property of their respective owners. |
|
|
  |
| FourBlades |
 May 3 2021, 12:19 PM May 3 2021, 12:19 PM
Post
#541
|
|
From Wreck to Rockin     Group: Members Posts: 2,056 Joined: 3-December 07 From: Brevard, FL Member No.: 8,414 Region Association: South East States 
|
Thanks everyone, I am glad to be here.
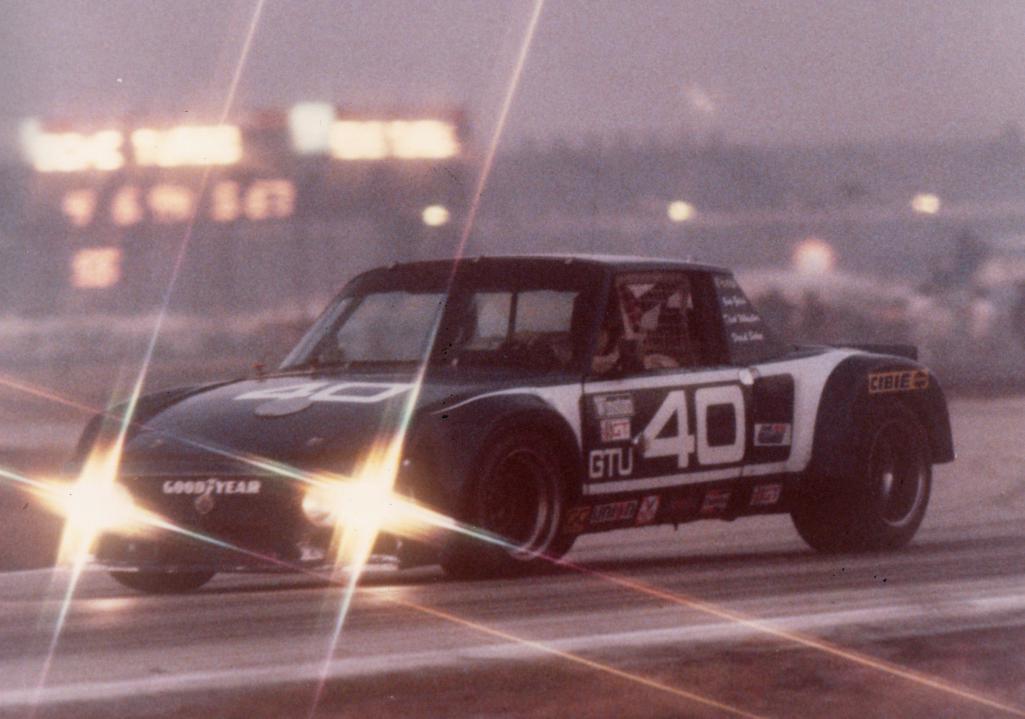
Getting my blue 914 running again really motivated me to finish this one. There are a lot of amazing build threads going on since I was active. I especially love the Sonauto #40 project being done by Marty. The perfect person to take care of that car. John |
| trojanhorsepower |
 May 3 2021, 03:13 PM May 3 2021, 03:13 PM
Post
#542
|
|
Senior Member    Group: Members Posts: 867 Joined: 21-September 03 From: Marion, NC Member No.: 1,179 Region Association: None |
John,
Glad you are better. You are still making more progress than me. Peter |
| Root_Werks |
 May 4 2021, 08:44 AM May 4 2021, 08:44 AM
Post
#543
|
|
Village Idiot      Group: Members Posts: 8,653 Joined: 25-May 04 From: About 5NM from Canada Member No.: 2,105 Region Association: Pacific Northwest 
|
Been a long time since I read through this thread! Very glad to know you're okay and the project is still around. Looks good!
|
| 9146GUY |
 May 4 2021, 10:58 AM May 4 2021, 10:58 AM
Post
#544
|
|
Member   Group: Members Posts: 116 Joined: 29-November 15 From: Central Ohio Member No.: 19,420 Region Association: Upper MidWest |
This thread, which I had not seen before today, brings back many memories. I raced a 914-6 back in the day when this car was raced. I do not remember the car but lots of the things done to it are what we did in the day. The fuel discriminator valve is one of those things. The rules back then said that the valve had to be in sight of the fueler. They were mostly mounted inside on the rollbar just like the original photos show. We could run a 26 gallon fuel cell back then. Car would run for over 2 hours on a fill.
Glad to hear that you are over your health issues and have resumed the restoration. Old guys and old cars rock and rule.....LOL |
| FourBlades |
 May 4 2021, 01:54 PM May 4 2021, 01:54 PM
Post
#545
|
|
From Wreck to Rockin     Group: Members Posts: 2,056 Joined: 3-December 07 From: Brevard, FL Member No.: 8,414 Region Association: South East States 
|
Thanks for the comments, folks! 914World community has provided a lot of the motivation and information I needed to keep me continuing on. Hey 9146GUY, do you have any pictures of 914s racing in the 70s and 80s to share? John |
| no1uno |
 May 4 2021, 03:43 PM May 4 2021, 03:43 PM
Post
#546
|
|
Member   Group: Members Posts: 206 Joined: 2-December 10 From: Melbourne, FL Member No.: 12,448 Region Association: South East States |
Glad to hear you're doing better, John. Awesome new shop, too! Let me know if you ever need a hand with anything. I think you're probably a bit closer now that you're inland instead of beachside.
|
| Rleog |
 May 5 2021, 06:47 AM May 5 2021, 06:47 AM
Post
#547
|
|
Senior Member    Group: Members Posts: 611 Joined: 12-October 03 From: Middleton, MA Member No.: 1,239 Region Association: North East States 
|
Welcome back, John. Glad to see that the IMSA project car will be going forward. You’ve come so far with it and it’s in the right hands.
|
| rgalla9146 |
 May 5 2021, 08:30 AM May 5 2021, 08:30 AM
Post
#548
|
|
Advanced Member     Group: Members Posts: 4,739 Joined: 23-November 05 From: Paramus NJ Member No.: 5,176 Region Association: None 
|
Good to hear a health story with a positive outcome. Welcome back. Your big project continues...you've got an enthusiastic audience. Roll on. |
| 9146GUY |
 May 5 2021, 08:38 AM May 5 2021, 08:38 AM
Post
#549
|
|
Member   Group: Members Posts: 116 Joined: 29-November 15 From: Central Ohio Member No.: 19,420 Region Association: Upper MidWest |
OK John, you asked ..... I don't have pictures of other cars but I do have some of mine
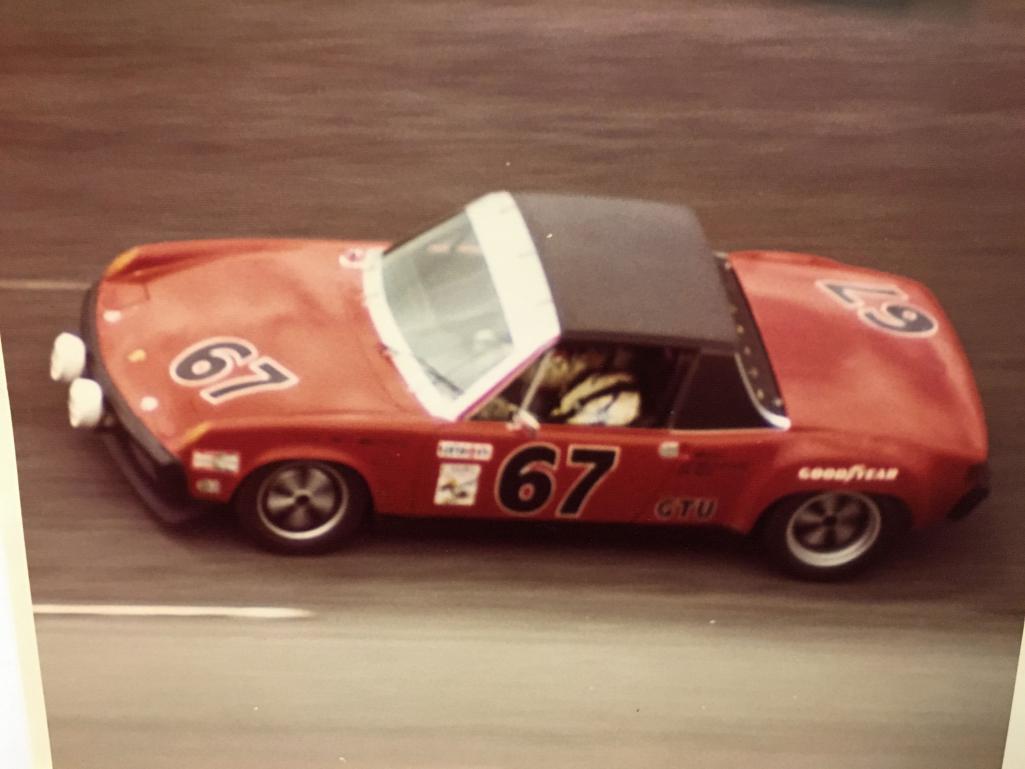 Daytona 1972 Finale. Dave White at the wheel. I bought the car from Dave in December 1975 and prepped the car and went to the 24HR of Daytona in 1976. I had won the SE Division B Production in a 911 and worked a deal with Goodyear. We ran their new radial GT street tire and ran the entire race on one set of very bald tires. 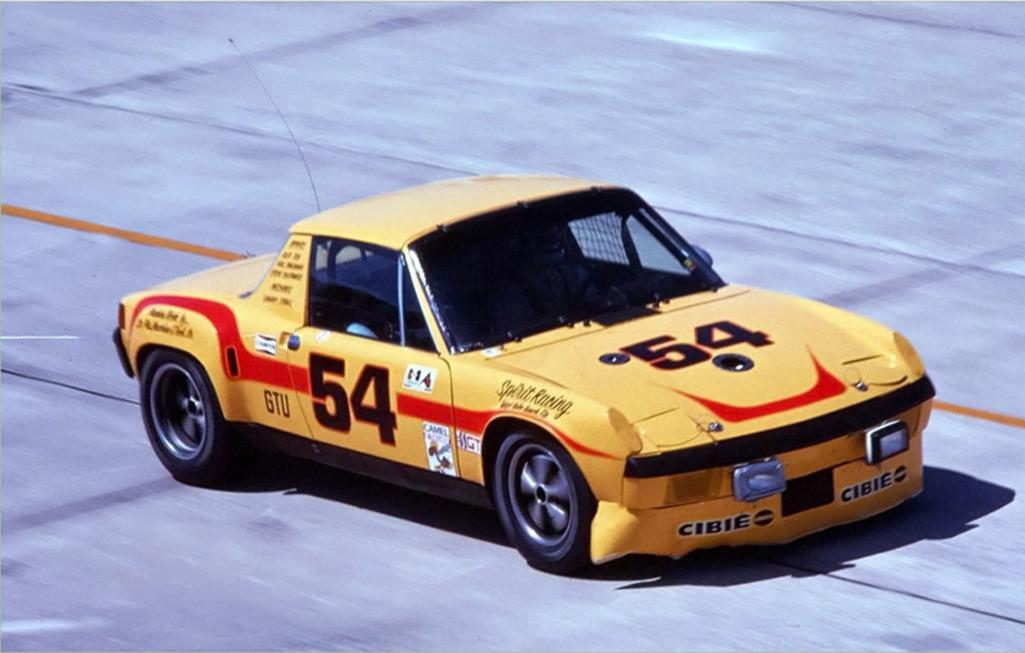 Notice that the headlights still pop up, nothing in the spoiler. At Daytona that cost almost 8 MPH on the banking. That was before they put the chicane in the back straight and added lights around the track. The driving lights on the front bumper were more for corner lighting than straight ahead. Part 2 coming.... |
| 9146GUY |
 May 5 2021, 08:44 AM May 5 2021, 08:44 AM
Post
#550
|
|
Member   Group: Members Posts: 116 Joined: 29-November 15 From: Central Ohio Member No.: 19,420 Region Association: Upper MidWest |
|
| 9146GUY |
 May 5 2021, 08:51 AM May 5 2021, 08:51 AM
Post
#551
|
|
Member   Group: Members Posts: 116 Joined: 29-November 15 From: Central Ohio Member No.: 19,420 Region Association: Upper MidWest |
Other changes for short tracks. Lumbermans 500 at Mid Ohio
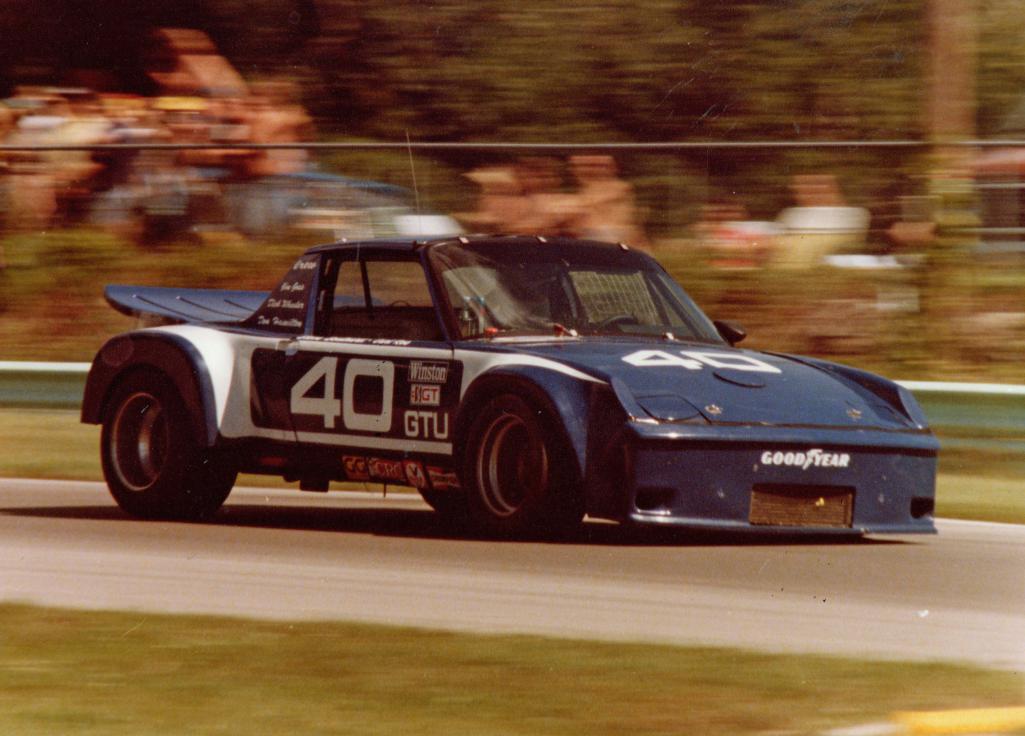 Note rear wing. Looks like a 911 wing was grafted on the rear decklid. Rules stated that air couldn't pass under a rear wing/spoiler. Added plexiglass along the leading edges got us around that rule. The difference at Mid Ohio was with the small spoiler turn 1 was brake, downshift, drive thru turn With the big wing turn 1 was lift, turn in and accelerate thru corner. AH the memories..... |
| FourBlades |
 May 6 2021, 05:43 AM May 6 2021, 05:43 AM
Post
#552
|
|
From Wreck to Rockin     Group: Members Posts: 2,056 Joined: 3-December 07 From: Brevard, FL Member No.: 8,414 Region Association: South East States 
|
Great pictures and stories. Are all the pictures of the same car, just with different paint schemes? So popping up your headlights would slow the car 8 mph at Daytona? That is interesting and I guess it makes sense given how large they are and located at the front of the car. Thanks for sharing! John |
| 9146GUY |
 May 12 2021, 08:07 AM May 12 2021, 08:07 AM
Post
#553
|
|
Member   Group: Members Posts: 116 Joined: 29-November 15 From: Central Ohio Member No.: 19,420 Region Association: Upper MidWest |
All the same car...Just updated over the years based on rules changes
|
| FourBlades |
 May 13 2021, 01:31 PM May 13 2021, 01:31 PM
Post
#554
|
|
From Wreck to Rockin     Group: Members Posts: 2,056 Joined: 3-December 07 From: Brevard, FL Member No.: 8,414 Region Association: South East States 
|
Saving the front bumper.
The fiberglass front bumper was heavily damaged and repaired over the years. Several places had an inch of bondo and kitty hair to repair major cracks. The bumper also was too narrow to fit the car after I corrected the damage to the front end as shown earlier in the thread. 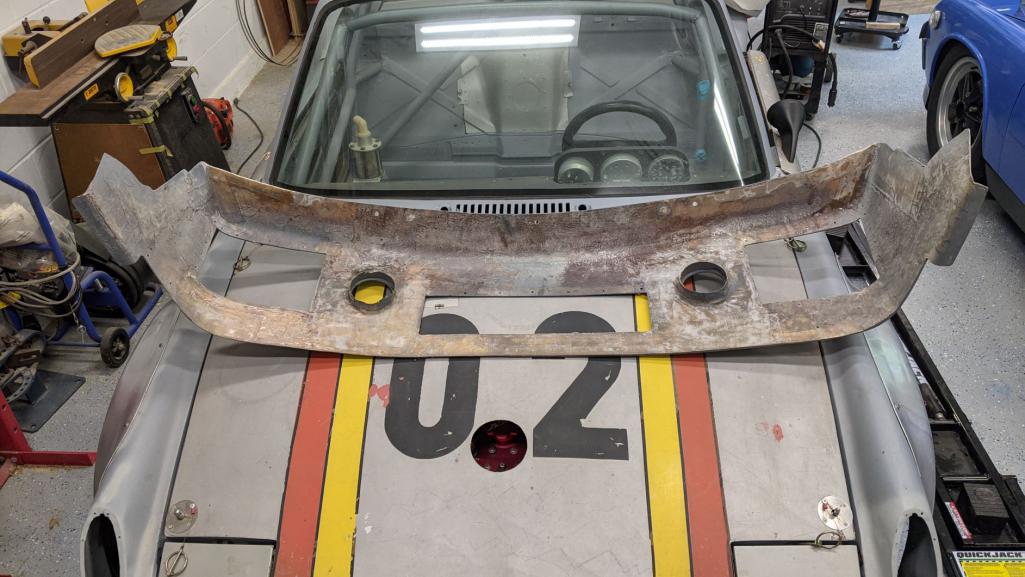 I ground down the old repairs and tapered their edges. I used to build surfboards way back so I am familiar with fiberglass repairs. It used to make me super itchy doing this work 30 years ago but now it does not bother me anymore for some reason, probably the fact that I actually use safety gear now. (IMG:style_emoticons/default/smile.gif) Reshaped the bumper to fit the correct width front end. This took many iterations to get it close. Repaired the damage using layers of polyester resin and fiberglass cloth. 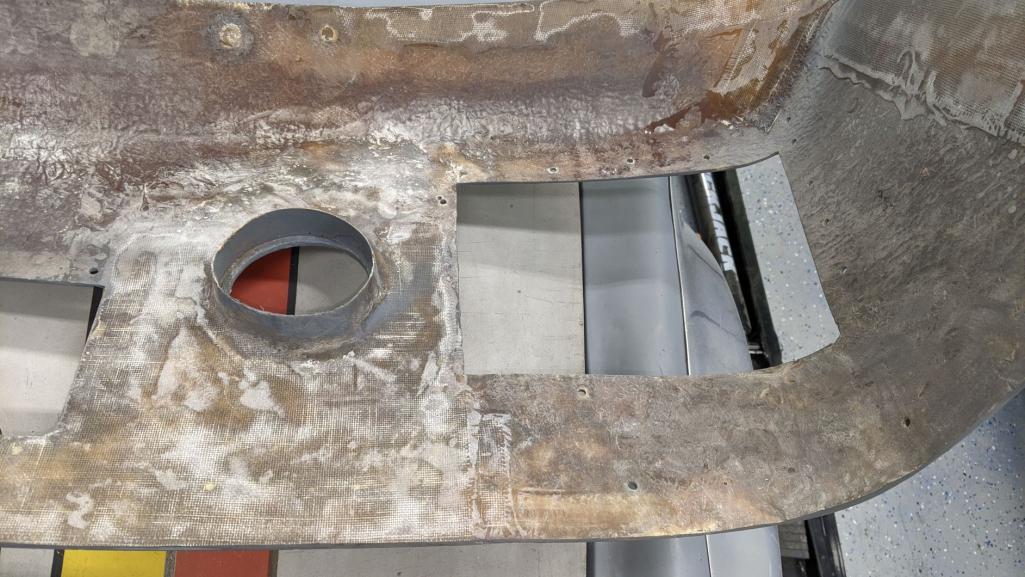 I should have weighed it before and after the repairs, but it is probably less than half the weight it used to be. John |
| FourBlades |
 May 13 2021, 01:38 PM May 13 2021, 01:38 PM
Post
#555
|
|
From Wreck to Rockin     Group: Members Posts: 2,056 Joined: 3-December 07 From: Brevard, FL Member No.: 8,414 Region Association: South East States 
|
BYW, the fiberglass repairs were done years ago, I just never posted them before. Still trying to catch up with everything that has happened. John |
| FourBlades |
 May 13 2021, 01:56 PM May 13 2021, 01:56 PM
Post
#556
|
|
From Wreck to Rockin     Group: Members Posts: 2,056 Joined: 3-December 07 From: Brevard, FL Member No.: 8,414 Region Association: South East States 
|
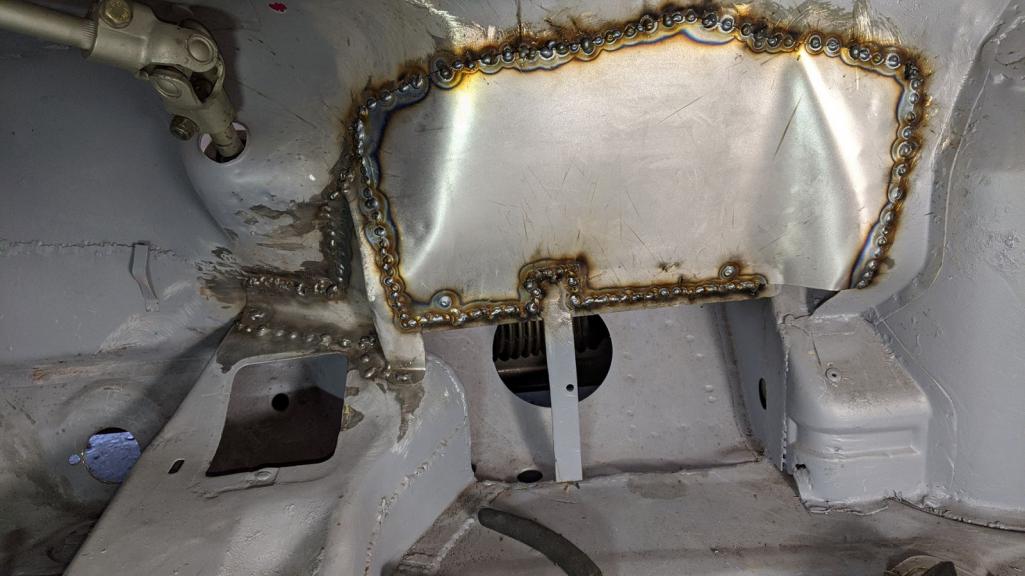
There is a large hole in the firewall which connects the passenger area to the front of
the car. This was cut to accommodate the bottom of the oil tank, which you can see sitting on the angle iron platform. This hole needs to be closed up for safety and rules compliance. 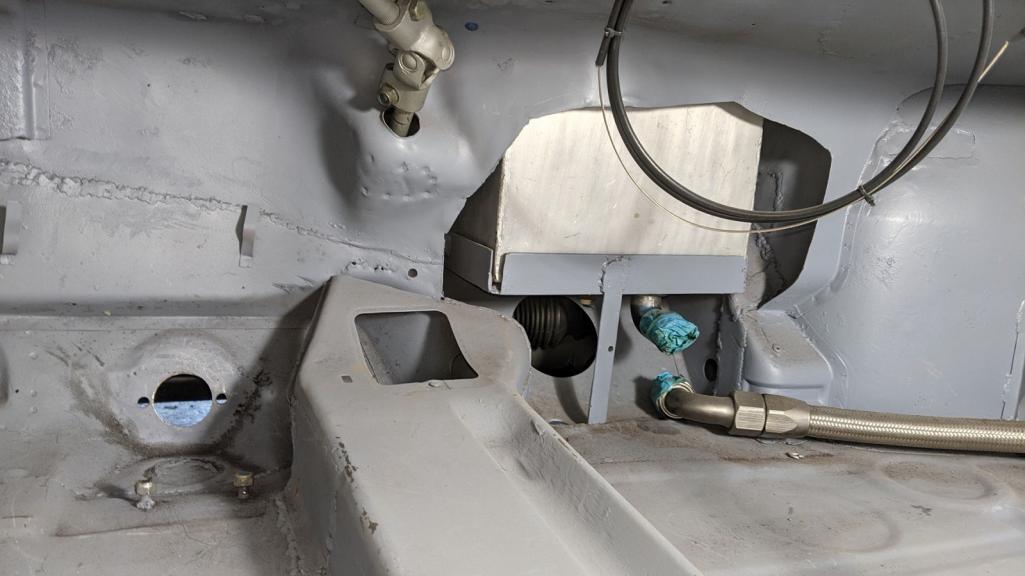 The hole has a very complex shape, so I decided to tackle it using several pieces. Just getting a piece cut off from a stock firewall will not work because of the size and shape of the oil tank they used. Make a template: 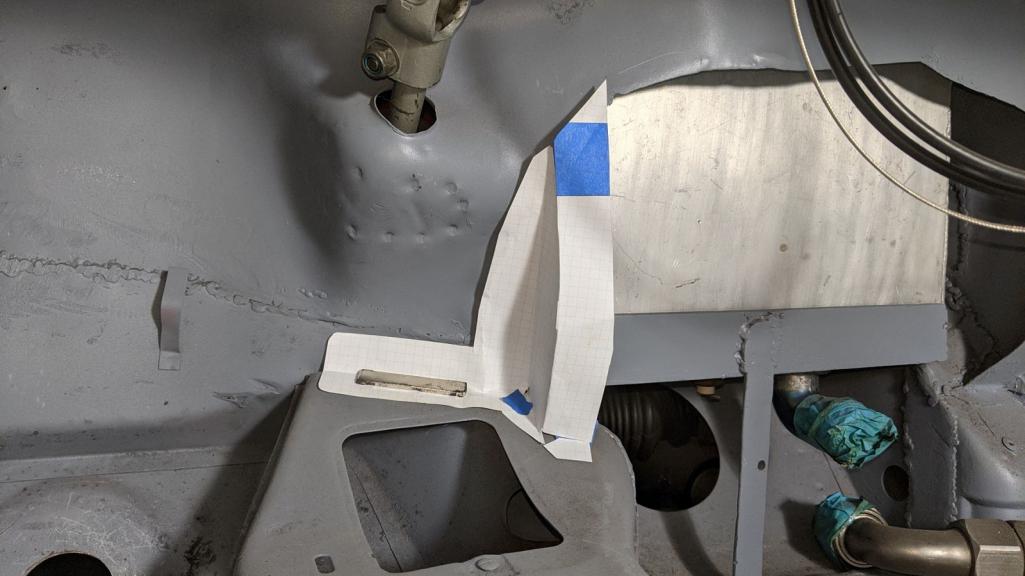 Make it in metal: 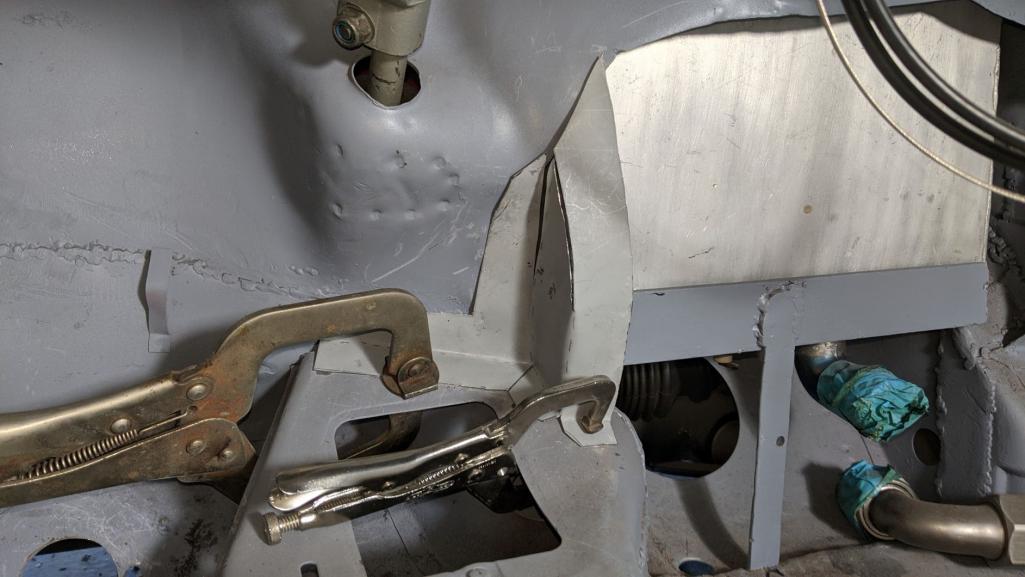 Weld it on: 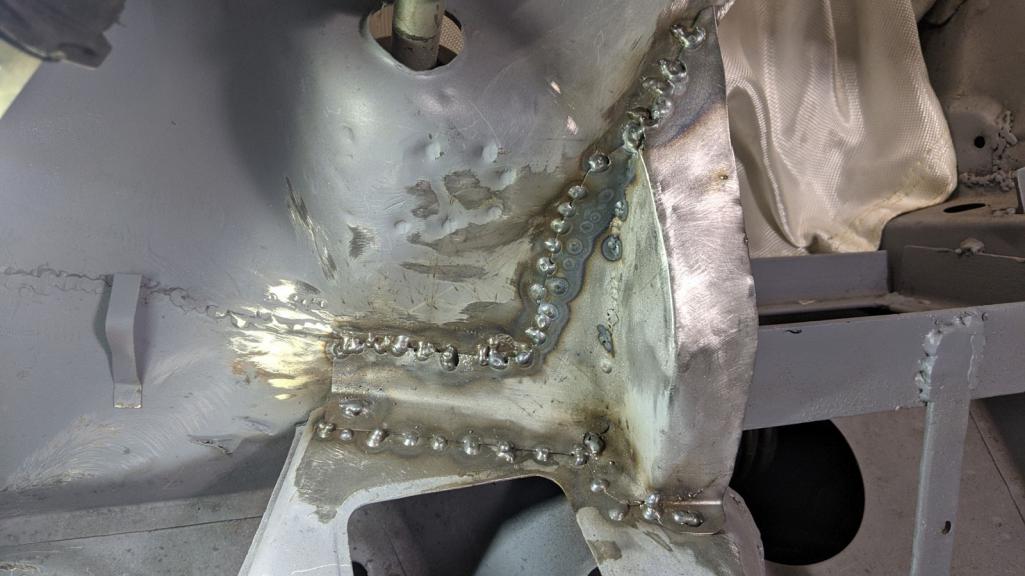 Keep in mind that this is the deepest part of the footwell under the dashboard. I pretty much have to jam myself in there with my welder and other tools. I can work for 30 minutes or so before I need to crawl out and do some serious stretching. It is hard to get nice looking welds working like this. (IMG:style_emoticons/default/smile.gif) John |
| FourBlades |
 May 13 2021, 02:00 PM May 13 2021, 02:00 PM
Post
#557
|
|
From Wreck to Rockin     Group: Members Posts: 2,056 Joined: 3-December 07 From: Brevard, FL Member No.: 8,414 Region Association: South East States 
|
|
| URY914 |
 May 13 2021, 05:37 PM May 13 2021, 05:37 PM
Post
#558
|
|
I built the lightest 914 in the history of mankind.                                                                                                     Group: Members Posts: 126,214 Joined: 3-February 03 From: Jacksonville, FL Member No.: 222 Region Association: None |
Hey John, good to hear from you.
|
| FourBlades |
 May 16 2021, 07:27 PM May 16 2021, 07:27 PM
Post
#559
|
|
From Wreck to Rockin     Group: Members Posts: 2,056 Joined: 3-December 07 From: Brevard, FL Member No.: 8,414 Region Association: South East States 
|
How are you Paul? How is your car running?
Sharing some parts porn, mostly to document for myself what parts I have for this project and what I still need to find. Some of these parts I bought more than 5 years ago so it is getting hard to remember them all. (IMG:style_emoticons/default/smile.gif) Some engine mount goodness. The plates are from Mittelmotor and took a while to get here. The rubber piece is the new URO reproduction for $140ish, while the originals were up to $2000+ before these came out. I got the engine mount from ebay, I believe. Altogether this is $1000+ just to mount the front of the engine to the car. These parts work with the engine mount that was welded into the car when I got it. 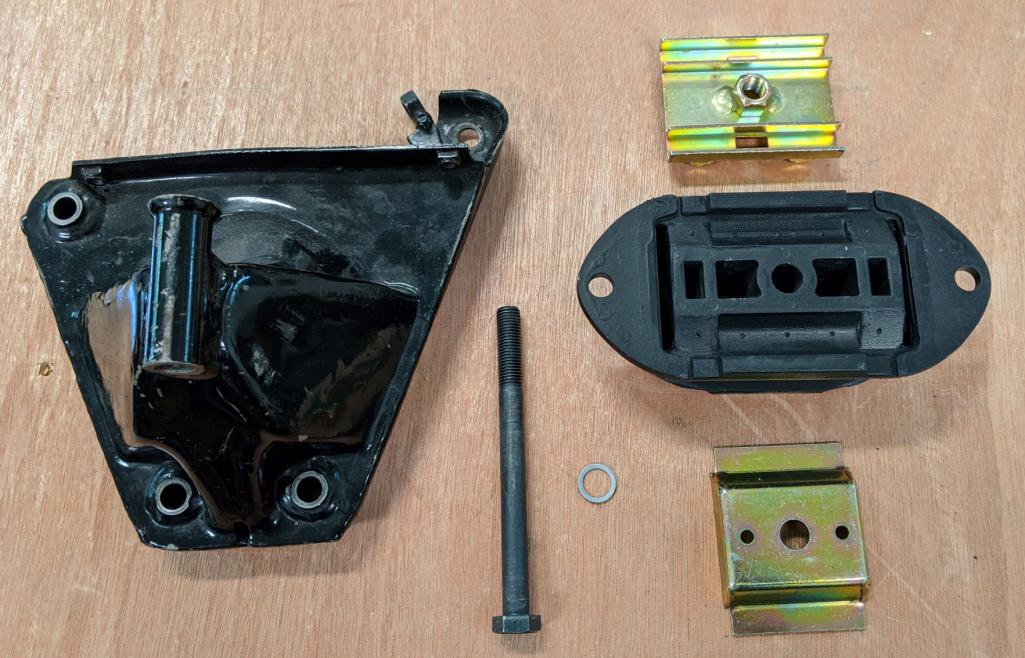 A whole collection of Aeroquip fittings to finish the fuel and oiling systems. The yellow thing is an actual size cardboard template of a fitting I wanted to try out before buying one and then not have it fit. These parts are $$ especially for the -12 and -16 sizes. 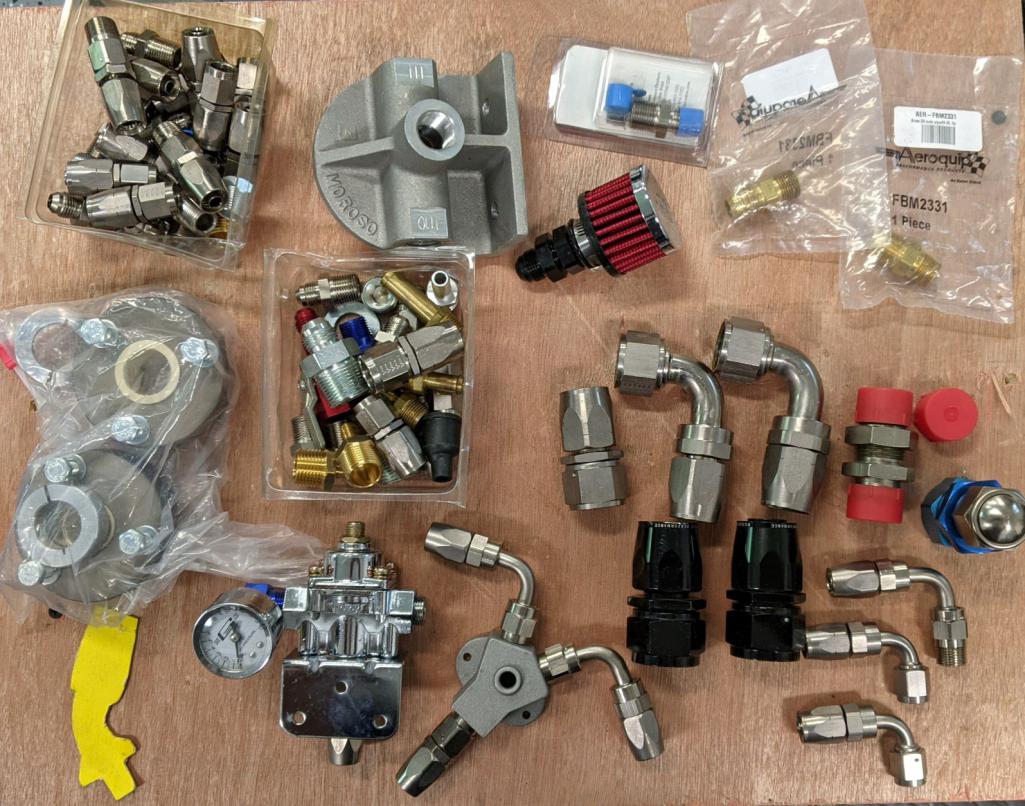 New sway a way axles, pedal cluster rebuilt by the one and only Bruce Stone, and toe link adjusters that can be welded on the stop toe alignment changes. 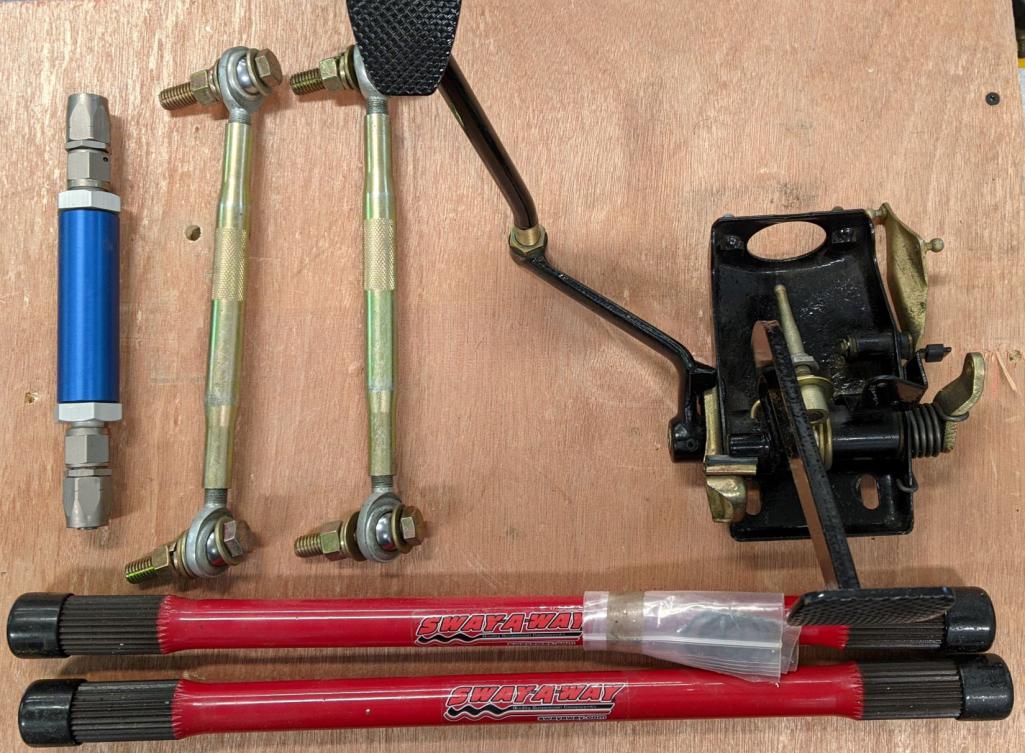 Gotta love new and refinished parts. John |
| FourBlades |
 May 16 2021, 07:47 PM May 16 2021, 07:47 PM
Post
#560
|
|
From Wreck to Rockin     Group: Members Posts: 2,056 Joined: 3-December 07 From: Brevard, FL Member No.: 8,414 Region Association: South East States 
|
Finishing up the firewall. Created more patches and a service plate to close it up.
I thought it would be helpful to be able to remove this plate in order to access this area. 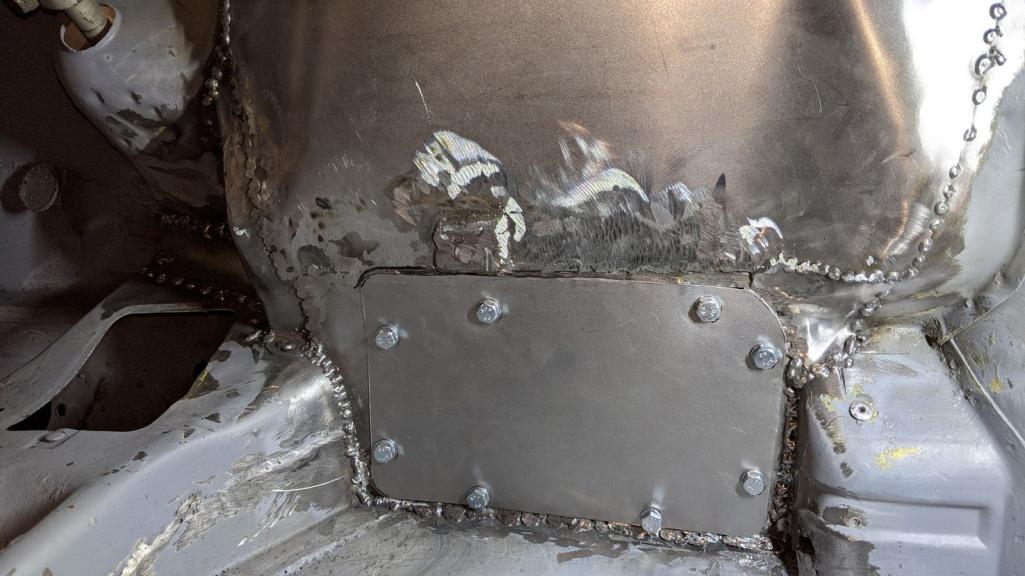 Using the paper template I made to locate the fitting at the bottom of the oil tank. 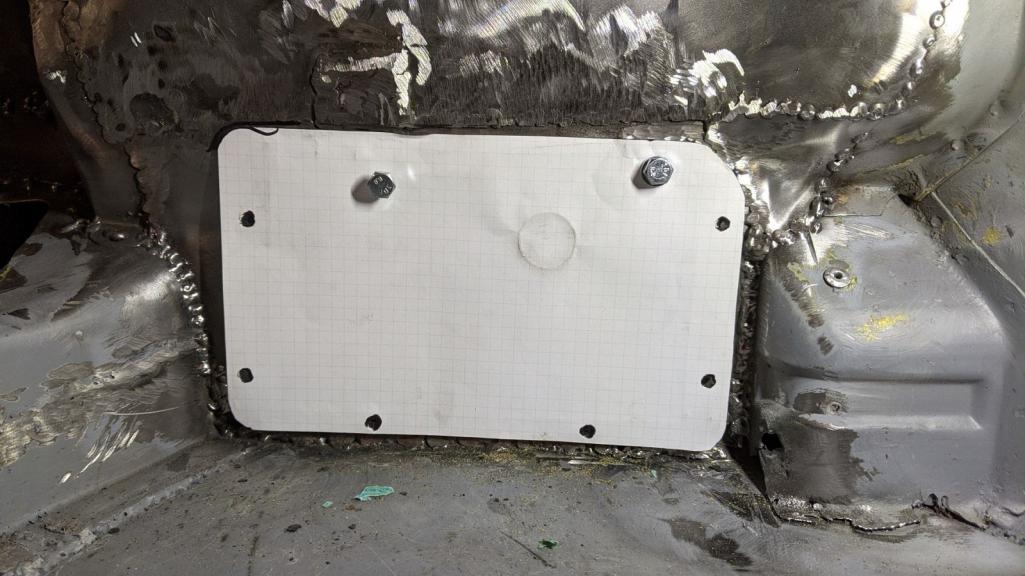 Hole drilled using a hole saw. -16 oil return line attached to the oil tank. I will add a firewall grommet (still in the mail) to close up the gap. 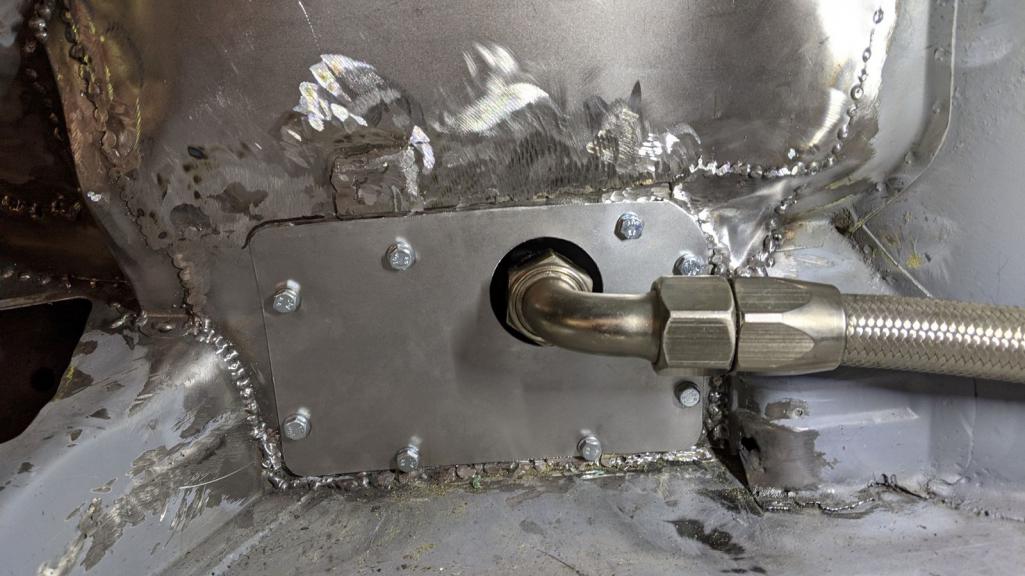 Looking forward to not working down under the dash anymore. Everything takes twice as long and it is hard to make nice welds. Next I need to finish the fuel system in the front of the car. John |
  |
10 User(s) are reading this topic (10 Guests and 0 Anonymous Users)
0 Members:

|
Lo-Fi Version | Time is now: 27th April 2025 - 06:06 AM |
Invision Power Board
v9.1.4 © 2025 IPS, Inc.


