|
|
|
Porsche, and the Porsche crest are registered trademarks of Dr. Ing. h.c. F. Porsche AG.
This site is not affiliated with Porsche in any way. Its only purpose is to provide an online forum for car enthusiasts. All other trademarks are property of their respective owners. |
|
|

  |

| falcor75 |
 Mar 29 2020, 02:34 AM Mar 29 2020, 02:34 AM
Post
#381
|
|
Senior Member  Group: Members Posts: 1,579 Joined: 22-November 12 From: Sweden Member No.: 15,176 Region Association: Scandinavia |
Thank you for all your comments and suggestions. About the script I prefer my car without....the only place it says Porsche on the whole car is on the engine grille and I kinda like that understated look.
|
   |

 
|
| falcor75 |
Apr 20 2020, 09:01 AM
Post
#382
|
|
Senior Member Group: Members Posts: 1,579 Joined: 22-November 12 From: Sweden Member No.: 15,176 Region Association: Scandinavia |
Well I managed to burn the tach output on my ECU so that will take 4-6 weeks to fix so now I have time for some needed upgrades.
(IMG:http://www.914world.com/bbs2/uploads_offsite/matsgarage.com-15176-1587394873.1.jpg) The nice seats I bought last year doesnt quite work with the stock seat rails/bases. The seats ended up much too high and too reclined for my taste. I've been thinking about this alot but in the end there is no other solution than tho notch the beam that goes under the seats. The stock 914 seats will never go back into this car anyway since I will use them for my other project. Before getting this far I've measured the whole area and done some testing in Solidworks to make sure it will work. (IMG:http://www.914world.com/bbs2/uploads_offsite/matsgarage.com-15176-1587394874.2.jpg) Then its just to bring out the step drill and the airsaw and get stuck in there. The rail was much nicer inside than I expected. Surface rust on the bottom but still very solid. I wirebrushed it was best I could and then treated it with a rust converter. (IMG:http://www.914world.com/bbs2/uploads_offsite/matsgarage.com-15176-1587394875.3.jpg) The aftermarket seat rails I bought for the Seven project gets used for mocking up and I have ordered a second pair so both cars will use the same kind of rails. |
|
|
|
| Frankvw |
Apr 20 2020, 10:51 AM
Post
#383
|
|
working on my first 914 ! Group: Members Posts: 653 Joined: 13-April 16 From: Holland, the Netherlands Member No.: 19,896 Region Association: Europe |
Wow Mats, I guess you really measured a couple of times before actually cutting that ! Good luck with this project !
|
|
|
|
| Spoke |
Apr 20 2020, 03:58 PM
Post
#384
|
|
Jerry Group: Members Posts: 7,149 Joined: 29-October 04 From: Allentown, PA Member No.: 3,031 Region Association: None |
Nice cut job. What's the plan to close up the brace?
|
|
|
|
| falcor75 |
Apr 21 2020, 06:55 AM
Post
#385
|
|
Senior Member Group: Members Posts: 1,579 Joined: 22-November 12 From: Sweden Member No.: 15,176 Region Association: Scandinavia |
(IMG:http://www.914world.com/bbs2/uploads_offsite/matsgarage.com-15176-1587473751.1.jpg)
Good question Spoke. The original material wasnt very thick, 0,8-0,9 mm (20-22 gauge) and I'm making the filler pieces from 1,5 mm (thats about 15 gauge?) (IMG:http://www.914world.com/bbs2/uploads_offsite/matsgarage.com-15176-1587473752.2.jpg) Welded in a capture nut on the underside as an offering to the Binky gods. (IMG:http://www.914world.com/bbs2/uploads_offsite/matsgarage.com-15176-1587473753.3.jpg) Looks like it will fit ok. Thank god for slotted holes tho.. (IMG:style_emoticons/default/biggrin.gif) (IMG:http://www.914world.com/bbs2/uploads_offsite/matsgarage.com-15176-1587473753.4.jpg) Outside patch panel made. I'm using the masking tape trick in which you cover the hole with masking tape and run a dirty glove finger around the edge. This leaves an imprint of the edge on the tape. You pull the tape off the part and cut away the excess and as you fold out the tape onto your sheet stock you get a perfect pattern of the piece you need to make. (IMG:http://www.914world.com/bbs2/uploads_offsite/matsgarage.com-15176-1587473754.5.jpg) The outside panel got a capture nut too but I forgot to take a photo of that in the excitement of things moving forward and going quite well. (IMG:http://www.914world.com/bbs2/uploads_offsite/matsgarage.com-15176-1587473755.6.jpg) First test fit ! The front upper edge of the seat has come down 70 mm or almost 3 inches and makes the seat sit more upright. This makes me able to push the seat back another 50 mm or two inches because the top of the seatback doesnt hit the firewall as early as before. Success !! |
|
|
|
| eric9144 |
Apr 21 2020, 09:17 AM
Post
#386
|
|
Advanced Member Group: Members Posts: 2,769 Joined: 30-March 11 From: San Diego, CA Member No.: 12,876 Region Association: Southern California |
QUOTE(falcor75 @ Apr 21 2020, 05:55 AM)  Success !! (IMG:style_emoticons/default/first.gif) Lets see more of those seats! |
|
|
|
| DRPHIL914 |
Apr 21 2020, 09:24 AM
Post
#387
|
|
Dr. Phil Group: Members Posts: 5,819 Joined: 9-December 09 From: Bluffton, SC Member No.: 11,106 Region Association: South East States |
I had been following your work and progress on instagram, and recognized those pictures.
looks like those seat will now sit just like you wanted. The guy who sold you those seats go real defensive about you saying they didn’t fit, which i didn’t really understand. it didn’t seem to me like you were saying that, but my feeling is he should be marking these as fitting in a 914, because they don’t without some significant modification. it’s not like everyone has the ability or skill to do what you are doing here. Anyway, i do like those seats, do they interfere with the E-brake function? Phil QUOTE(falcor75 @ Apr 21 2020, 08:55 AM) (IMG:http://www.914world.com/bbs2/uploads_offsite/matsgarage.com-15176-1587473751.1.jpg) Good question Spoke. The original material wasnt very thick, 0,8-0,9 mm (20-22 gauge) and I'm making the filler pieces from 1,5 mm (thats about 15 gauge?) (IMG:http://www.914world.com/bbs2/uploads_offsite/matsgarage.com-15176-1587473752.2.jpg) Welded in a capture nut on the underside as an offering to the Binky gods. (IMG:http://www.914world.com/bbs2/uploads_offsite/matsgarage.com-15176-1587473753.3.jpg) Looks like it will fit ok. Thank god for slotted holes tho.. (IMG:style_emoticons/default/biggrin.gif) (IMG:http://www.914world.com/bbs2/uploads_offsite/matsgarage.com-15176-1587473753.4.jpg) Outside patch panel made. I'm using the masking tape trick in which you cover the hole with masking tape and run a dirty glove finger around the edge. This leaves an imprint of the edge on the tape. You pull the tape off the part and cut away the excess and as you fold out the tape onto your sheet stock you get a perfect pattern of the piece you need to make. (IMG:http://www.914world.com/bbs2/uploads_offsite/matsgarage.com-15176-1587473754.5.jpg) The outside panel got a capture nut too but I forgot to take a photo of that in the excitement of things moving forward and going quite well. (IMG:http://www.914world.com/bbs2/uploads_offsite/matsgarage.com-15176-1587473755.6.jpg) First test fit ! The front upper edge of the seat has come down 70 mm or almost 3 inches and makes the seat sit more upright. This makes me able to push the seat back another 50 mm or two inches because the top of the seatback doesnt hit the firewall as early as before. Success !! |
|
|
|
| Cairo94507 |
Apr 21 2020, 09:37 AM
Post
#388
|
|
Michael Group: Members Posts: 10,297 Joined: 1-November 08 From: Auburn, CA Member No.: 9,712 Region Association: Northern California |
I love your seats! Great work. (IMG:style_emoticons/default/beerchug.gif)
|
|
|
|
| BeatNavy |
Apr 21 2020, 09:48 AM
Post
#389
|
|
Certified Professional Scapegoat Group: Members Posts: 2,951 Joined: 26-February 14 From: Easton, MD Member No.: 17,042 Region Association: MidAtlantic Region |
Looks great, Mats. Nice welds, too! (IMG:style_emoticons/default/pray.gif)
|
|
|
|
| Maltese Falcon |
Apr 21 2020, 09:57 AM
Post
#390
|
|
914 Guru Group: Members Posts: 5,042 Joined: 14-September 04 From: Mulholland SoCal Member No.: 2,755 Region Association: None |
Perfect job Matt's !¡ may replicate your hard work into our build (IMG:style_emoticons/default/smile.gif) Need to see what our mounting kit looks like first...when the seat order goes down.
Marty |
|
|
|
| falcor75 |
Apr 21 2020, 12:03 PM
Post
#391
|
|
Senior Member Group: Members Posts: 1,579 Joined: 22-November 12 From: Sweden Member No.: 15,176 Region Association: Scandinavia |
QUOTE(eric9144 @ Apr 21 2020, 05:17 PM) QUOTE(falcor75 @ Apr 21 2020, 05:55 AM) Success !! (IMG:style_emoticons/default/first.gif) Lets see more of those seats! @eric9144 There are some more pictures on page 17 in this thread. |
|
|
|
| falcor75 |
Apr 21 2020, 01:22 PM
Post
#392
|
|
Senior Member Group: Members Posts: 1,579 Joined: 22-November 12 From: Sweden Member No.: 15,176 Region Association: Scandinavia |
Yes saying they fit in a 914 is technically correct but they are not bolt in and to get them to fit well you either need to remove the backpad or do some mods of your own.
The seats do interfer slightly with the handbrake, but it still works. It still remains to be seen how well now that I adjust the drivers seat position aswell. (IMG:style_emoticons/default/smile.gif) |
|
|
|
| falcor75 |
Apr 22 2020, 12:41 PM
Post
#393
|
|
Senior Member Group: Members Posts: 1,579 Joined: 22-November 12 From: Sweden Member No.: 15,176 Region Association: Scandinavia |
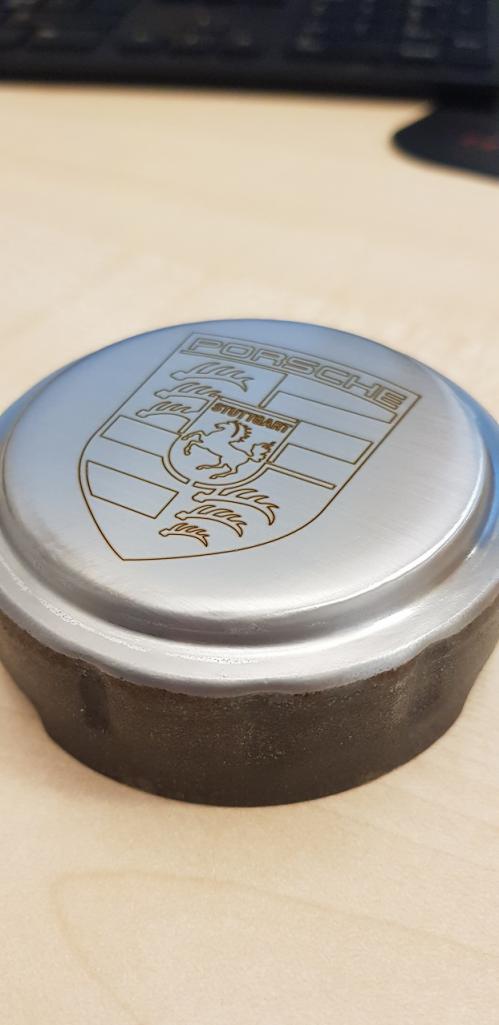 Polished up my old crusty gas cap yesterday and though it would be cool to upgrade it a bit. So I edited an old file i had of the Porsche crest and scaled it to fit on the top surface and asked the lady manning the laser etching machine at work to have a go. Turned out great ! (IMG:style_emoticons/default/biggrin.gif) 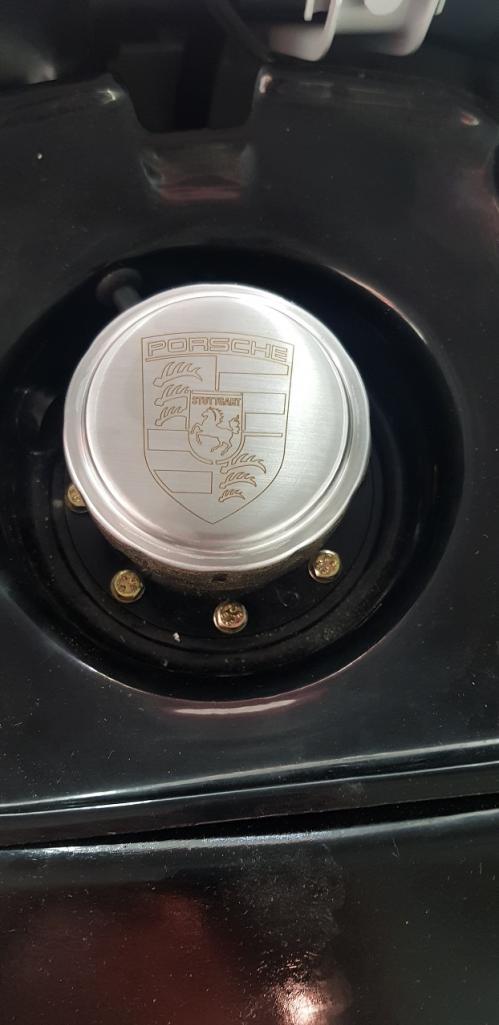 In place on the car, aligned so the point of the crest points forwards with the cap in the closed position. |
|
|
|
| Spoke |
Apr 22 2020, 01:18 PM
Post
#394
|
|
Jerry Group: Members Posts: 7,149 Joined: 29-October 04 From: Allentown, PA Member No.: 3,031 Region Association: None |
Nice gas cap. That would be one heck of a product for someone to make.
|
|
|
|
| falcor75 |
Apr 22 2020, 09:35 PM
Post
#395
|
|
Senior Member Group: Members Posts: 1,579 Joined: 22-November 12 From: Sweden Member No.: 15,176 Region Association: Scandinavia |
QUOTE(Spoke @ Apr 22 2020, 09:18 PM) Nice gas cap. That would be one heck of a product for someone to make. I dont think making stuff with the Porsche crest on it would be very poular seen from Porsches viewpoint. One would get a cease and decist pretty quickly. |
|
|
|
| falcor75 |
Apr 23 2020, 11:09 AM
Post
#396
|
|
Senior Member Group: Members Posts: 1,579 Joined: 22-November 12 From: Sweden Member No.: 15,176 Region Association: Scandinavia |
Well I just found that the drivers seat fits with the e-brake handle in place but there isnt any space to lift the handle. So I will need to make my own bracket and move it forwards along the side rail. Does anyone have a spare e-brake wire to donate or sell me? That way I could just use two of the short wires to lengthen system.
|
|
|
|
| mepstein |
Apr 23 2020, 11:12 AM
Post
#397
|
|
914-6 GT in waiting Group: Members Posts: 19,843 Joined: 19-September 09 From: Landenberg, PA/Wilmington, DE Member No.: 10,825 Region Association: MidAtlantic Region |
QUOTE(falcor75 @ Apr 23 2020, 01:09 PM) Well I just found that the drivers seat fits with the e-brake handle in place but there isnt any space to lift the handle. So I will need to make my own bracket and move it forwards along the side rail. Does anyone have a spare e-brake wire to donate or sell me? That way I could just use two of the short wires to lengthen system. Maybe modify the seat upholstery to be similar to the 914 driver seat cutout. On a 914 seat, it's just a slice of foam off the outside of the seat base. |
 |
|
| 914forme |
Apr 23 2020, 11:16 AM
Post
#398
|
|
Times a wastin', get wrenchin'! Group: Members Posts: 3,896 Joined: 24-July 04 From: Dayton, Ohio Member No.: 2,388 Region Association: None |
Or center tunnel mount the hand brake, but that is a bit more involved than a seat cushion slice of some padding.
|
|
|
|
| mepstein |
Apr 23 2020, 11:19 AM
Post
#399
|
|
914-6 GT in waiting Group: Members Posts: 19,843 Joined: 19-September 09 From: Landenberg, PA/Wilmington, DE Member No.: 10,825 Region Association: MidAtlantic Region |
QUOTE(914forme @ Apr 23 2020, 01:16 PM) Or center tunnel mount the hand brake, but that is a bit more involved than a seat cushion slice of some padding. But a cool option that I'm planning for mine. (IMG:style_emoticons/default/beerchug.gif) Jeff Hail's thread has a good photo tutorial on making a center handbrake. |
|
|
|
| 914forme |
Apr 23 2020, 11:23 AM
Post
#400
|
|
Times a wastin', get wrenchin'! Group: Members Posts: 3,896 Joined: 24-July 04 From: Dayton, Ohio Member No.: 2,388 Region Association: None |
(IMG:style_emoticons/default/agree.gif) I copied it, and later sold the copy. It uses the stock passenger side hand brake cable on both sides. Jeff's pictures make it easy to duplicate, and I added pictures also, in my EG thread.
|
|
|
|
|
1 User(s) are reading this topic (1 Guests and 0 Anonymous Users)
0 Members:

|
Lo-Fi Version | Time is now: 19th April 2025 - 05:49 PM |
Invision Power Board
v9.1.4 © 2025 IPS, Inc.